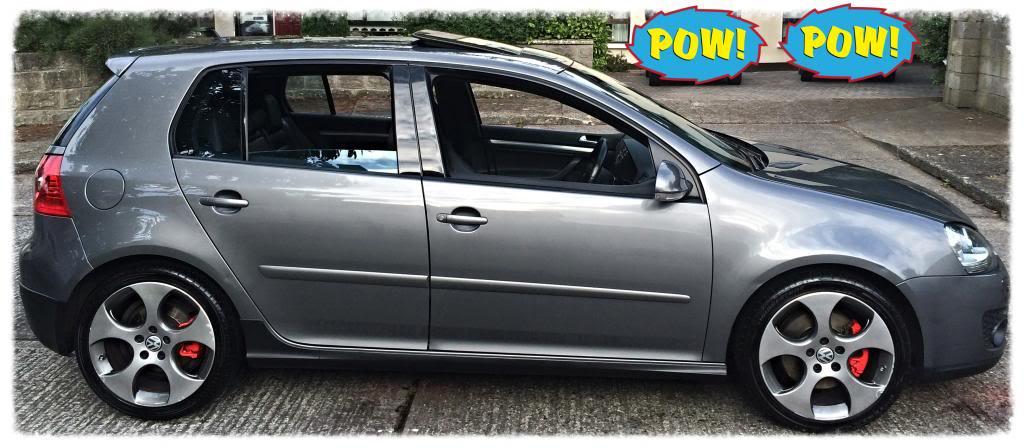
Luke’s GTI Build Thread – Dublin, Ireland I purchased my GTI in October 2013 after searching twice daily for 18 long months to get the right one. When I found this one it had only been posted 20 minutes so I left work early and drove 100 miles in Friday evening traffic to purchase it.
There’s not a huge interest in cars here in Ireland I have to say so I joined
www.mk5golfgti.co.uk in June because I was using the site on a daily basis as a guest for advice on any work I was doing on my car.
I’ve gone through most of the new GTI build threads on the forum and have found them very useful when it came to working on my own car so I thought I’d do the same and hopefully someone can pick up one or two things from me.

 Projects:
 1. GTI Seat Inserts
2. Cherry Red Hazard Switch
3. GTI Footrest Pedal
4. VW Centre Alloy Caps
5. HD Dashcam Mini 0801
6. VW Tyre Air Valve Caps
7. Super White Sidelights
9. RNS MFD² / RNSMFD2 screen scratch
10. Rear Badge Boot Handle
11. calipers Painted
12. Engine Cover
13. Exhaust Cleaned
14. Magnetic Registration Plate
15. Snowfoam
16. Plastic Cable Cover Below Seat
17. Replacing Door Handles & Switches
18. Replacing Door Sill Scuff Plates
19. Under Seat Drawers
20. Engine Intake Cover
21. Rubber Engine Mounts
22. Inner Boot Trim
23. Steering Wheel Plastic Surrounds
24. Diverter Valve
25. Outer CV Boot Replacement & Suspension Bearings
GTI Seat Inserts I love these inserts and they can be purchased in several different styles. Use eBay keywords such as ‘GTI Seat Inserts’ and you’ll find countless different ones. Here is a current link for the ones I purchased. Again the prices change regularly so look around to save a few euro
http://www.ebay.ie/itm/2PCS-Seat-Lift-Wrench-Seat-Insert-Trim-For-VW-GOLF-5-6-MK5-MK6-GTI-/171042685352?pt=UK_CarsParts_Vehicles_CarParts_SM&hash=item27d2f041a8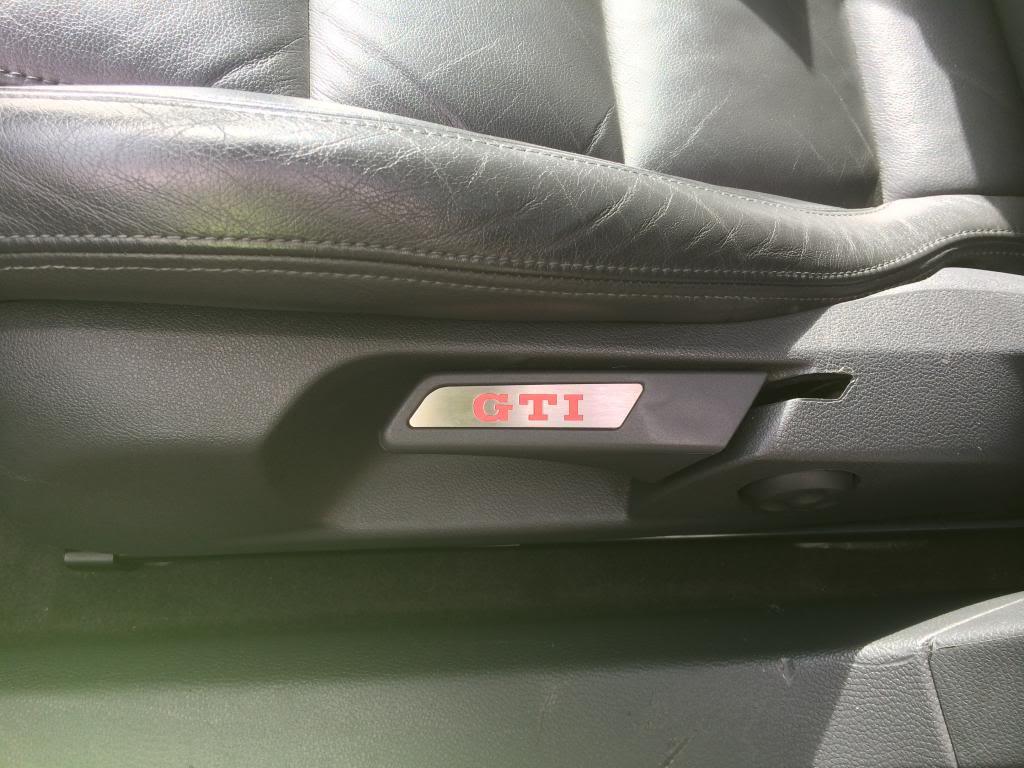 Cherry Red Hazard Switch
 This was a find I picked up here on the forum. My original hazard switch was faded to nothing.
http://www.ebay.ie/itm/160950900333?ssPageName=STRK:MEWNX:IT&_trksid=p3984.m1439.l2649


 GTI Footrest Pedal
 This piece really does look OEM and the work takes 10mins. You remove the plastic foot rest with the use of a single screw. Clean it down. Remove sticky tape from footrest and apply. Then you screw it in place permanently with the included screws. It may only be a small fix but I think it’s a must.
http://www.ebay.ie/itm/VW-GOLF-MK5-MK6-GTI-FOOTREST-R32-TURBO-EXCLUSIVE-WITH-OEM-BLACK-RUBBER-BACKING-/171151099551?pt=UK_CarsParts_Vehicles_CarParts_SM&hash=item27d966869f VW Centre Alloy Caps
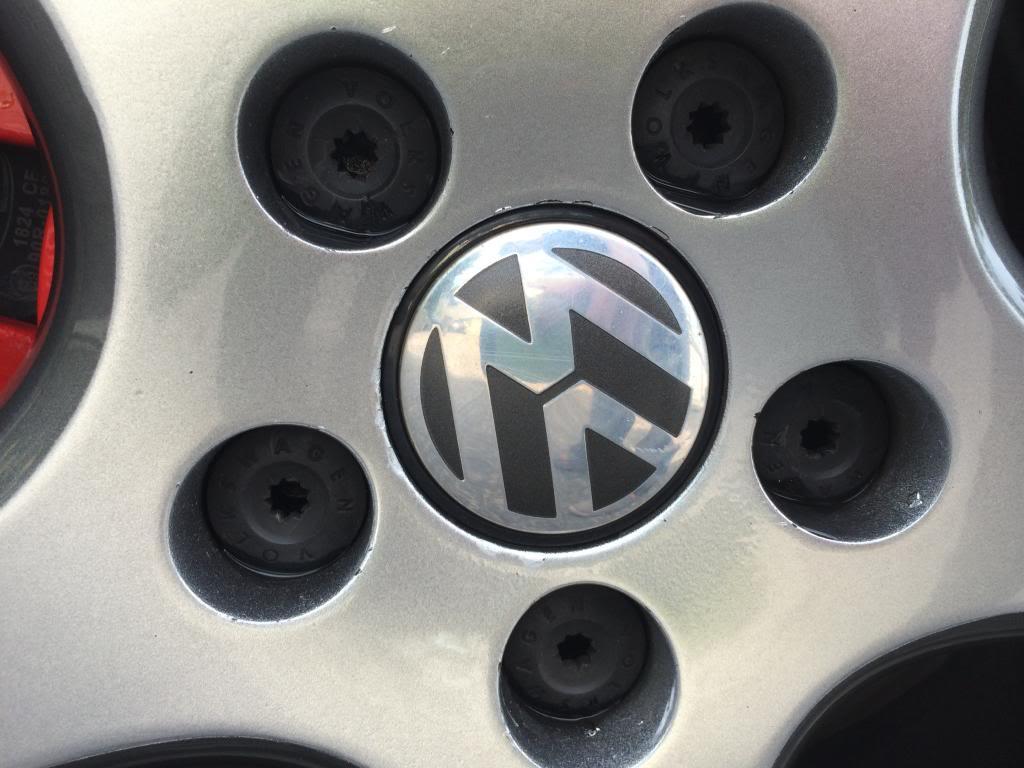
 My original ones were destroyed by whiteworm. How someone can let this happen and not do anything about it is beyond me. I picked another set up for my 18” monzas. 65mm caps suit mine. Also, I have to say these are on the car 6 months and they still look brand new. Part number - 3B7 601 171
 HD Dashcam Mini 0801
 This is one of my best purchases. I bought this from micksgarage.com for €100 which is the going price. The quality is amazing and it’s so small that it’s completely hidden by my rear view mirror. It runs on a continuous loop so as the SD card fills up it records over the oldest footage. I have a full guide and software for the firmware update if anyone is having trouble with it (I did at the start). The camera runs on motion detection so I leave it on in car parks and if I come out and find a new dent I know how it happened. Get one of these, trust me, it can really help if you’re in an accident too.
I was fed up having to plug it into the cigarette lighter every time so I direct wired it to my internal fuse box. Now it starts automatically when I turn the ignition on and turns off when I stop the car. The wires are also completely hidden so you won’t even notice it.
http://www.micksgarage.com/proddetails.aspx?pid=3419409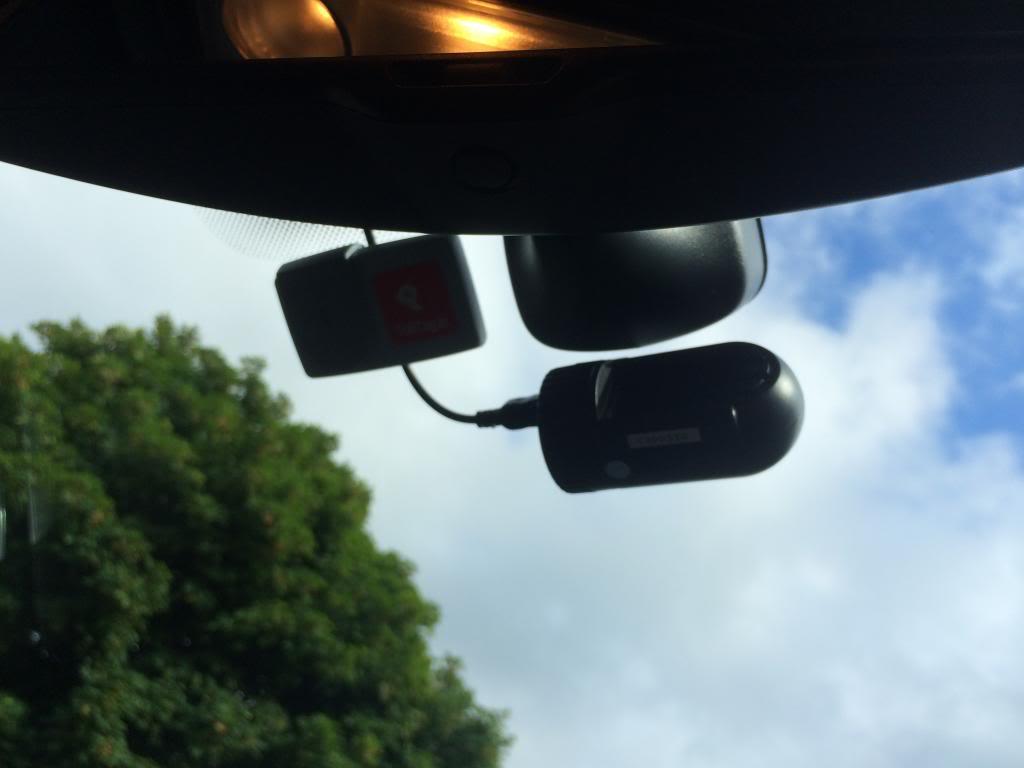
My very crude wiring diagram
 VW Tyre Air Valve Caps
 These small caps took 30 days to deliver from Hong Kong but it was worth the date. They match the alloys nicely and every time I go to a tyre shop I get asked how much they were and where to buy them. The photo was taken before I washed the car but they really have held up great.
http://www.ebay.ie/itm/Wheel-Tyre-Tire-Valve-Dust-Cap-Spanner-Keyring-Alloy-Stainless-For-VW-Volkswagen-/310969045536?pt=UK_Cars_parts_Vehicles_Wheels_tyres_trims_Valve_Caps_ET&hash=item48673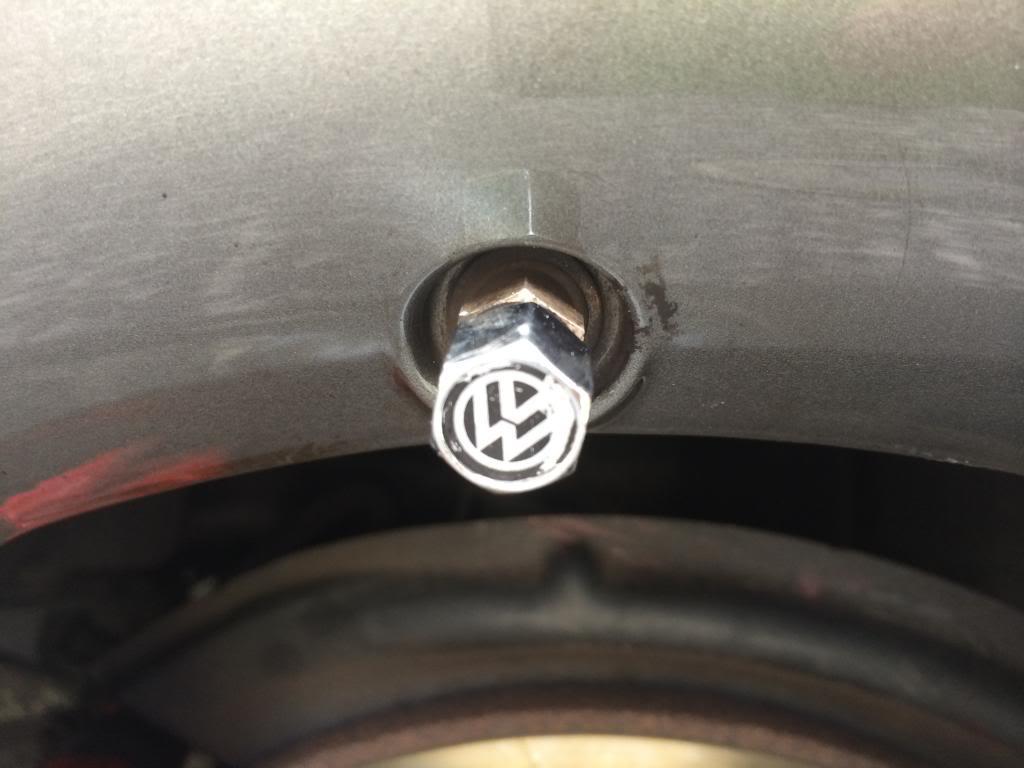 Super White Sidelights
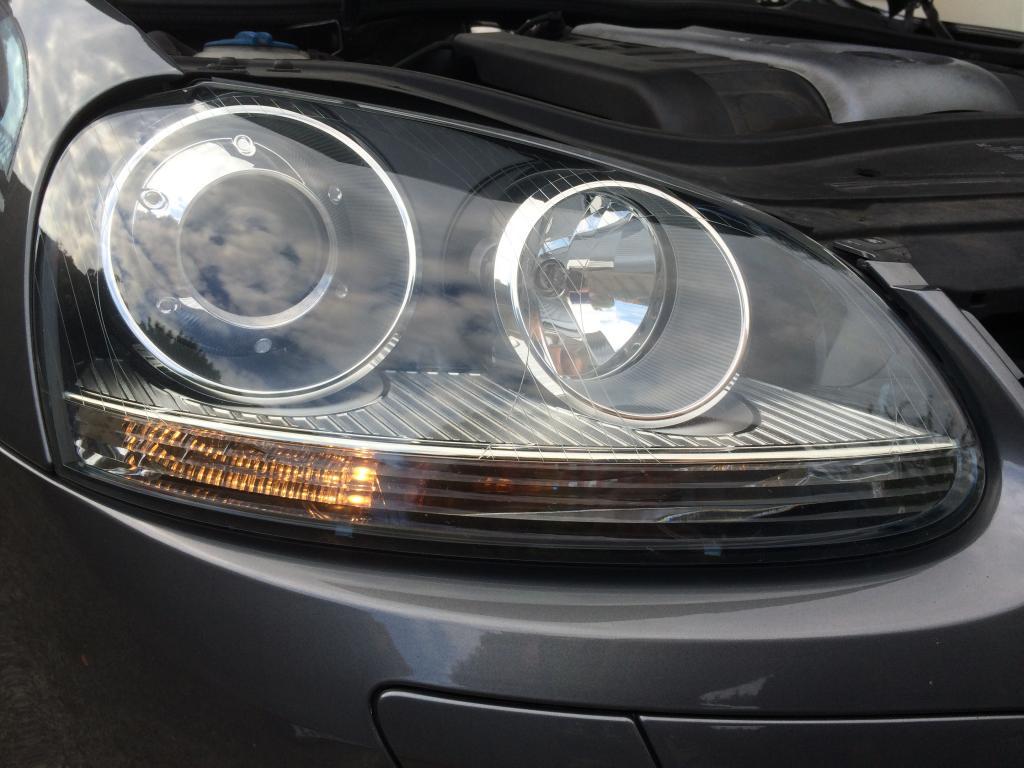
 I purchased these from eBay for only €5 and its well worth it. I don’t like the yellow sidelights so I changed them over for these xenon filled blue coated bulbs and they look great.
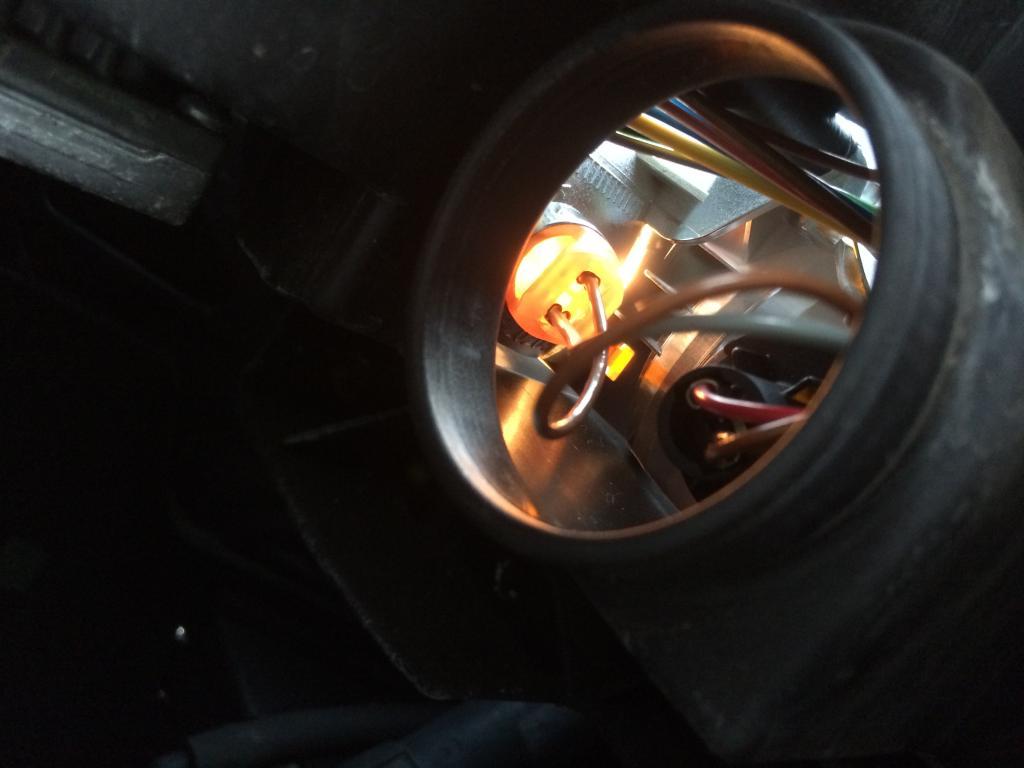
http://cgi.ebay.ie/ws/eBayISAPI.dll?ViewItem&item=301082143515The other reviews on the forum suggest removing the headlight to this work but it really is not necessary. I used my phone to take a picture of the light so I knew what I was looking for. I then used a needle nosed pliers with a 45° angle to grip the light housing. From the picture shown the sidelights have 2 cables coming off and the housing is an orangey-brown. Grip the housing NOT THE CABLE firmly with the pliers and pull directly out. Grip the original bulb firmly with your fingers and just pull out from the holder. Make sure you give the new bulb a quick wipe with a microfiber cloth before you plug it back in.
Tip: To make sure you’re getting the right light, turn on the sidelights to get an idea of where it is located but be sure to turn them back off before removing,
The driver side is a little more tricky because there’s a few things in the way. You can still get at it with pliers but you’re doing it blind so use your phones internal camera to see what you’re gripping or alternatively remove the front grill, loosen the headlight and pull out at a slight angle to get a better view. You don’t need to take the bumper off because you’re only tilting the headlight to one side.
 RNS MFD² / RNSMFD2 Screen Scratch
 The RNSMFD2 is not a touchscreen system but it would seem the last owner thought otherwise. There is a large scratch across the screen along with several small scratches. I suppose under the right lighting conditions it shows up worse. I found great reviews on the forum for a product called displex. It’s a polish that can be used specifically for monitors, displays etc. I picked mine up for €5 off eBay.
http://www.ebay.ie/itm/360952985587?ssPageName=STRK:MEWNX:IT&_trksid=p3984.m1439.l2649I used a lint free polishing cloth and applied light enough pressure so as not to damage the screen. I then wiped it down with a clean & dry microfiber cloth. I repeated the above twice.
I forgot to take before photos of the work but I really have to say the polish worked incredibly well. It removed all traces of the scratch and left no residue or haziness. Product is 10/10.
Rear Badge Boot Handle UPDATE - Page 2 Mk6 3D boot badge handle installed.This was the first job I undertook on my GTI. I noticed when I bought the car that it had slight whiteworm on the rear badge. Just a note here, my car is a 2005 model so the boot handle is a slow close mechanism with a flat VW badge for a handle. NOT the snap shut handle on newer Mk5 golfs.
After looking at the following review for replacement with the mk4 handle I set out to do the work.
http://www.mk5golfgti.co.uk/forum/index.php/topic,8746.0.htmlI purchased a mk4 golf gti badge which was the perfect fit. I then stuck it on using double sided tape.
The guide in the link above goes into full detail so I won’t say much on this myself as Garth has done a great job on it.
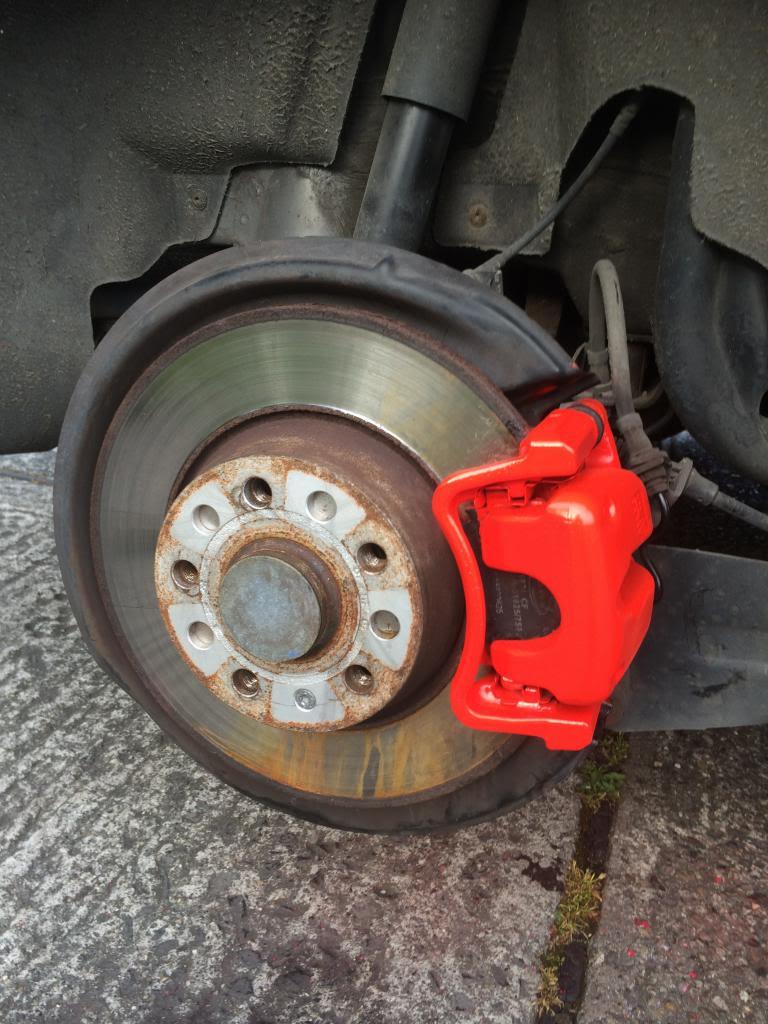
 calipers Painted
 My old faded pink calipers really took away from the look of the car so I tackled them over a few hours doing 2 wheels per night on a sunny Monday & Tuesday. Before you remove the 2 wheels make sure you mark which is front/back and that they go back on the same or you’re tracking will be off.
Safety: Use disposable gloves with harsh chemicals.
Products Used:
1. Alloy Cleaner
2. Brake Cleaner
3. 600 Grit Sandpaper
4. 1200 Grit Sandpaper
5. Flat Head Screwdriver
6. Pliers
7. Masking Tape Large
8. Masking Tape Small Detailing Tape
9. Newspaper
10. Brillo Pad
11. Temperature Resistant 650 degree red spray paint
12. Clear Lacquer Spray Paint
13. Silicone Remover
I jacked the car up and put axle stands under each support joint so that one side of the car was fully raised. Both wheels were then removed and set aside for their own repair work.
Firstly, I think you should try using the brillo bad with plenty of water on its own first. This may actually be enough to bring them back to good condition so PLEASE try this before you attack them.
I applied alloy wheel cleaner and allowed it to soak into the dirty calipers while I got set up.
I then removed the quick release spring from the front caliper and gave it a quick clean with the brillo pad.
I then started by taking off the already chipped paintwork with a flat head screwdriver.
I applied liberal amounts of the brake cleaner regularly.
I then went at them with a wet brillo pad removing what dirt I could.
Any bits of grease/dirt that remained were scraped off with the flat head screwdriver.
I then sanded the entire caliper down with 600 grit sandpaper which eventually moved up to 1200 grit sandpaper.
I cleaned down the entire unit with liberal amounts of silicone remover
http://www.micksgarage.com/proddetails.aspx?pid=1640492&pk=6aabfI then masked up the small detailed parts with the smaller detailing masking tape taking extra care around the pads etc. Make sure you cover the hose connections and fittings along with the centre of the face of the caliper or else you’ll spray your discs.
I then masked off the rest of the parts using the larger tape and added newspaper all around the wheel well and into the doors to prevent wayward sprats hitting the panels.
When everything was set up and ready to go I gave the calipers one last clean with brake cleaner which dried up in the sun in a couple of minutes. NO cloths here.
I then applied the first very thin layer of temperature resistant red spray paint. Remember you’re only giving it a few light coats or you’ll form droplets.
Each coat dried for me in about 20mins facing the sun in about 24° weather.
After another 1 or 2 more coats of red paint I was happy they were fully covered.
I then set upon applying the lacquer. Again in very thin layers.
I put the quick release spring back onto the front caliper very carefully holding it in place with the screwdriver and moving it with the pliers. Please be very careful doing this as I guarantee you will scratch the fresh painted caliper.
I put the wheels back on and gave the car a quick spin applying good braking pressure to make sure nothing was out of place.
Note: While the wheels were off and I was waiting on the coats to dry on the calipers I started to repair my alloys as shown in the next section.


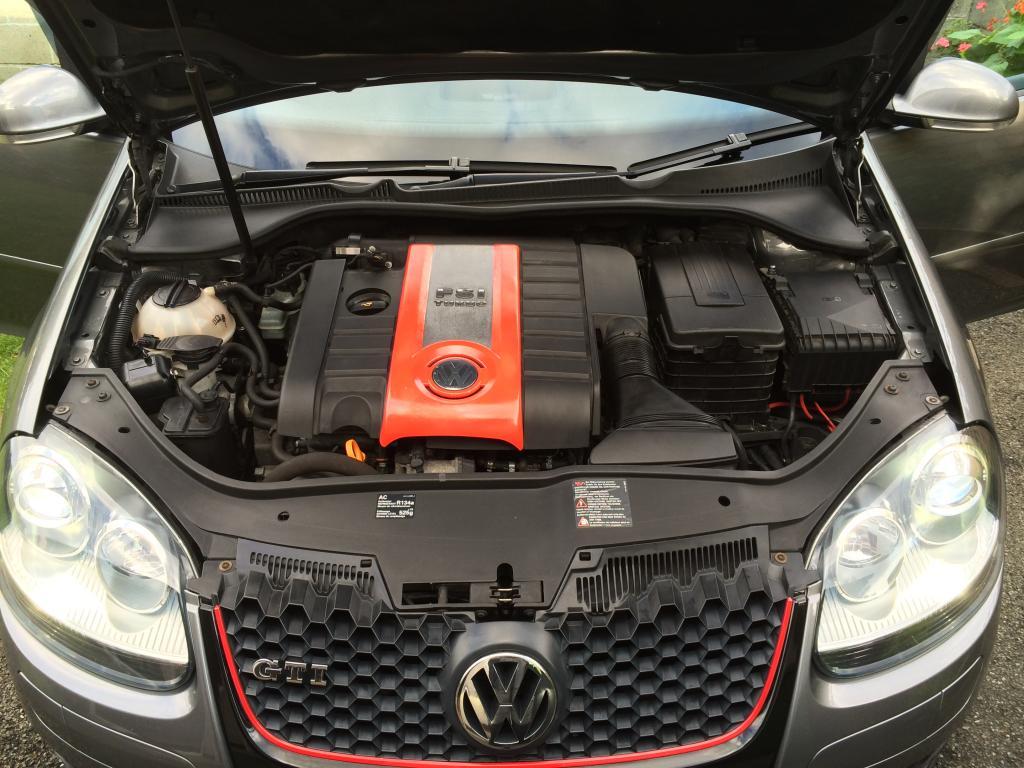
 Engine Cover
 Note: You only need to remove the grey cover on the engine to do this but I removed the entire casing as I wanted to replace the rubber mounts below.
The engine cover removal was tricky enough. It is held in place by 4 rubber grommets and at this stage of its life I guarantee that rubber has degraded and you will most likely tear one of the rubber grommets trying to get it off. Please see the guide I followed.
http://www.golfmkv.com/forums/showthread.php?t=113978I actually replaced these rubber grommets with new ones from VW parts as they were showing signs of wear. Only €2 each from memory.
I left the air suction pipe on and just unscrewed the 2 number torx bolts when taking mine off.
I then separated the silver FSI Turbo section from the middle of the engine cover which just snaps off. Do this in warmer weather or the clips might snap.
I cleaned the entire unit down with a sponge and soap.
I then covered it in silicone remover a few times to get every last bit of dirt off.
I then masked off the VW centre symbol and used a Stanley to get a perfect circle.
It then sanded down lightly with 600grit and 1200 grit sandpaper and gave it a final covering of silicone remover.
I sprayed the FSI Turbo cover with grey colour match paint to match the car and it really turned out well. I then masked off the FSI turbo section and sprayed the rest of it with the same temp resistant paint I used on my calipers.
2 coats of each and I removed tape and gave it all 2 coats of clear lacquer.
After lacquering I polished with very fine polish and gave it a wipe with a clean microfiber cloth before reinstalling.
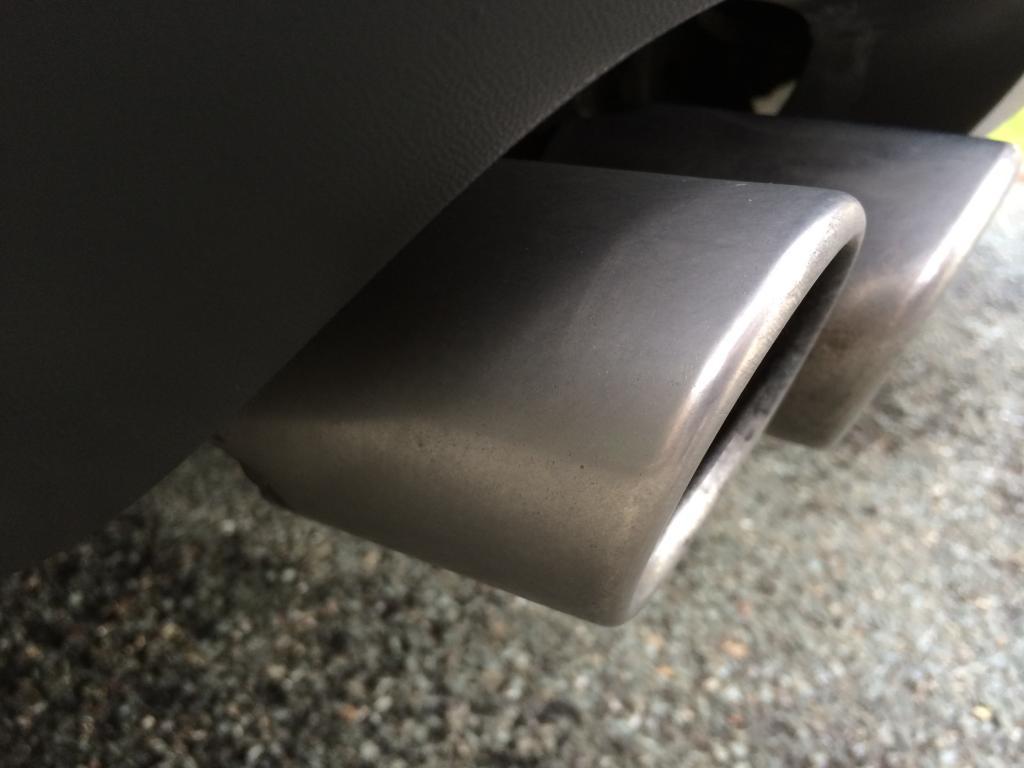
 Exhaust Cleaned
 I was advised by several people that my exhausts were too far gone and I’d never be able to repair them but I said why not give it a shot anyway. My exhausts before cleaning were black as coal and no amount of cleaning seemed to do anything. They had never been cleaned in 9 years so you can imagine how black they were but I forgot to take a before photo.
I put on 2 pairs of disposable latex gloves here because you’re dealing with some nasty stuff.
Products:
1. Alloy Cleaner
2. Brake Cleaner
3. 600 grit sandpaper
4. Brillo Pad
5. Cloth
6. Einszett Metal & Chrome Polish
I started by letting the alloy cleaner sit on the exhaust for 5minutes to ease off the gunk.
I then sprayed it liberally with brake cleaner and gave it a good going over with the brillo pad which I have to say did most of the work.
The burnt on bits that wouldn’t come off were attacked with a combo of wet and dry sanding.
Finally the chrome polish was added and given a good going over.
I actually repeated the entire process above when I was finished because I wanted the whole thing sparkling. This is the photo I took before I went over it a second time.
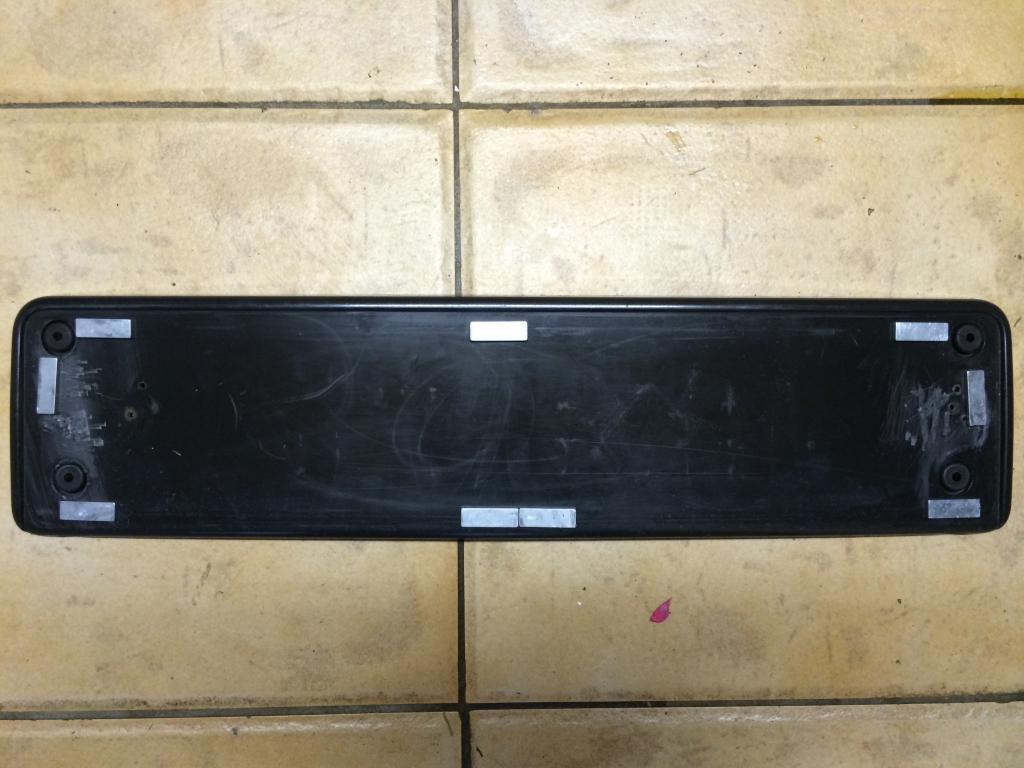
 Magnetic Registration Plates
 I got a nice set of aluminium German pressed plates for my car and tried holding them in place with 3m double sided tape. Unfortunately after time the 3m tape tends to lose its grip on the front plate due to temperature fluctuations and the curvature of the plate I imagine so I thought I’d hold them in place with magnets. Another benefit to this is that the plates can also be taken off with ease for taking photos if you didn’t want your reg on show.
I happened to have a load of neodymium magnets (the strongest naturally occurring magnet on the planet) at home for a previous project but they were too small and wouldn’t adhere to certain parts so I decided to go for some 30mm x 10mm x 2mm ones here
http://www.ebay.com.au/itm/5X-N35-Strong-Bar-Cuboid-Block-Magnets-Rare-Earth-Neodymium-30-x-10-x-3-mm-/131208288816?ssPageName=ADME:L:OC:IE:3160For the rear of the car I used double sided tape as the straight surface meant the tape was strong enough to hold it in place.
Note: The magnets are very fragile so be cautious when prising the magnets apart. They tend to snap!
With the front reg I removed the black registration plate holder and cleaned up both sides with silicone remover.
To remove the reg holder you need to push the plastic centre pin out of each corner holder. If you do this carefully they are reusable so do it in warm weather.
Now for aesthetics I decided I would place the magnets at the back of the holder so that when the front registration plate is removed you won’t see the magnets. Marking this up wasn’t as easy so measure twice stick once!
From the photo below you can see where I placed the magnets. This was the ideal place as too close to the corner and you would see them sticking out around the reg.
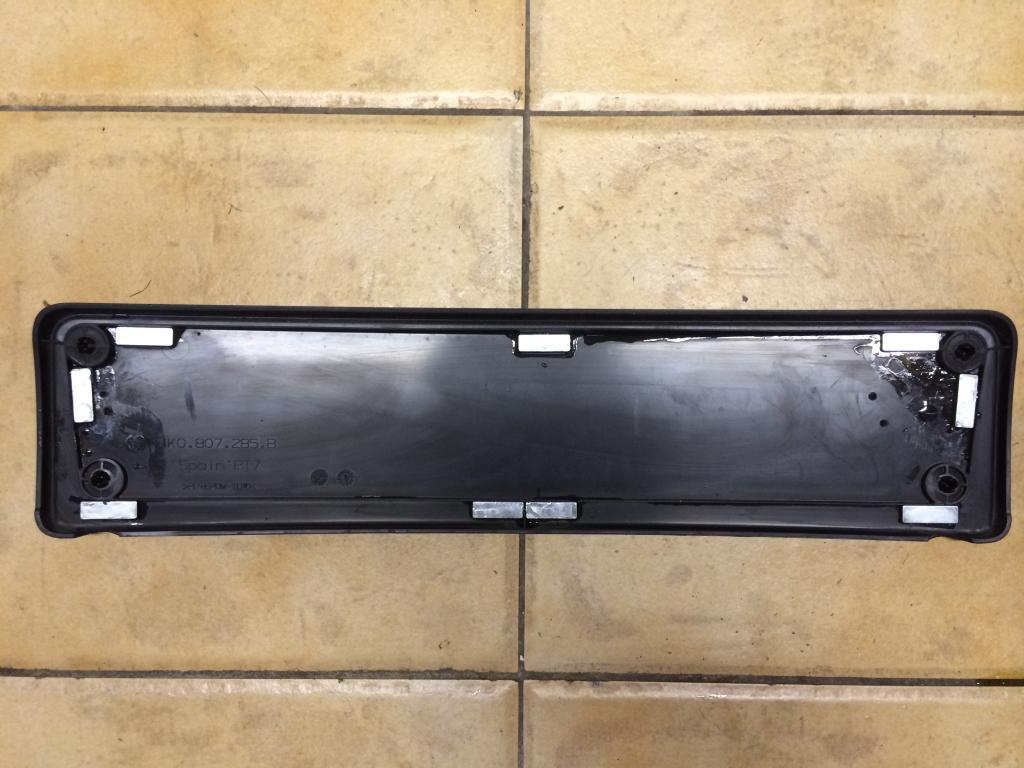
I then turned the plate holder over and dropped magnets onto the surface which automatically adhered to the other side.
I roughed up the back of the registration plate with a steel brush and some sandpaper and after a final clean with silicone remover it was good to go.
A SMALL amount of superglue was added to the top of each magnet and I put the reg in place. Too much and it will spill over onto the plastic and the magnet will stick to it.
After waiting a short time to dry I lifted the reg off and the magnets came with it leaving a clean black reg holder.
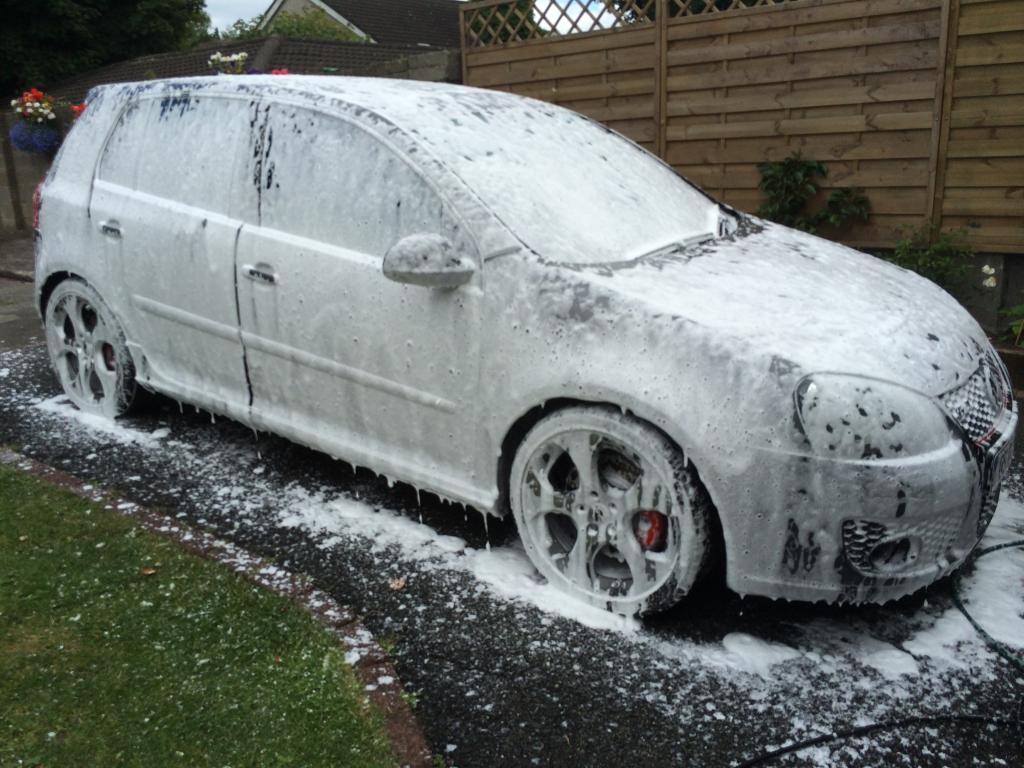
Snowfoam After hearing about snowfoam I decided to take a trip to Halfords. Just by chance they had a 3 for 2 sale on so I got 2 bottles of snowfoam and a bottle of spray shine ‘Car Plan Demon Foam’. I also got the 2 adapters for each bottle so now my challenge was to connect this adapter directly to my pressure washer so as I didn’t have to buy a snow foam lance.
My pressure washer came with 3 different nozzles so I sacrificed the wheel brush considering I don’t use it. This wheel brush has a threaded female connection which I connected to a corresponding threaded male connection with a male hose connection on the other side. I then used a short length of braided hose to connect the male hose connection to a female hose connection. A jubilee clip held the hose onto the male hose connection and the female hose connection is tightened in place.
After a quick round of PTFE tape to provide a good seal on the threaded connection I was good to go. Although the above seems confusing I basically just connected the original pressure washer connection to the demon foam hose connection with a few fittings I had lying around.

The connection piece I made comes off incredibly easy and fits both the snow foam and the spray shine so now the whole car can be washed in half the time.
 Boot Plastic Snapped
 So I put up a few photos of this crack and apparently it’s a fairly common problem. The plastic trim is very easily removed. I did it in the lashing rain in about 2 minutes and the part number is 1K6 863 459 T. This is around €40 from VW and an easy fix.

Additional info here on my original thread
http://www.mk5golfgti.co.uk/forum/index.php/topic,86142.msg881606.html#msg881606Plastic Cable Cover Below Seat This also seems like a fairly common missing item. It really annoyed me that I could see the cables every time I moved the seat back.
Part Numbers:
Drivers side 1k0971981A
Passenger side 1k0971981B
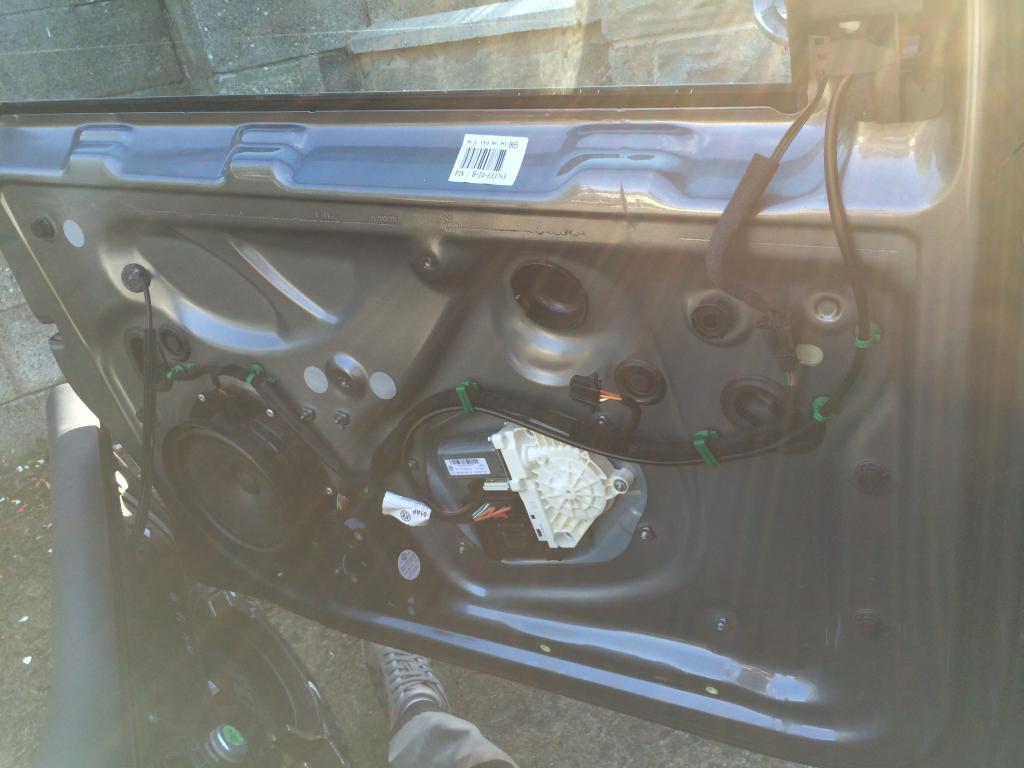
 Replacing Door Handles & Switches
 A common theme among VW seems to be the coating on the handles and switches being scratched off over the years. The mk6 golf came out with chrome tipped switches so no more scratching off on the buttons but the handles themselves will wear again in a few years.
I went with aliexpress.com for the switches after checking feedback on the forum. I picked up these ones for €36
http://www.aliexpress.com/snapshot/6169988034.htmlI then set about replacing the front 2 door handles which I bought direct from VW.
Part numbers for 5 door handles below:
Handle: V1k0867179d
Cover: v1k0868039b
Cover: v1k4868050c
There are many guides on here for replacing so I won’t go into much detail.
Driver Side:
The driver side is very easy. I used a piece of plastic to prize the handle off which isn’t too difficult at all. The old switches simply unplug and unclip with a flat head screwdriver. A 5 minute hob here.
Passenger Side:
Now this is messy. The passenger side handle is made up of 2 pieces. If you’re only changing the switch then you’re fine and you can access the switch by taking off the lower section and unplugging switch from below.
IMPORTANT- There are 3 number hidden torx screws holding the handle in place from the inside of the door leaf. Do not try and pull the handle off thinking they’re only clips.
If you’re replacing handle then you need to remove the 2 number torx screws from the handle. Then you need to remove the inner door leaf which is held in place by around 7 pop clips. Do this in warm weather or you’ll crack the clips.
Some of the clips will stick in the door frame after removal so you’ll need to use a pliers to get them out and put them back into the door leaf before replacing.
You then need to unclip the wires on the door leaf before getting to the back of the handle and removing the 3 number hidden torx screws holding the handle in place.
Replacing Door Sill Scuff Plates My original scuff plates were stock plates and I wanted to upgrade to the GTI logo ones. I picked up a 4 piece set for my 5 door again from aliexpress.com for only €22.
They sent me out the wrong ones so I’m still waiting for the new ones to arrive.
http://www.aliexpress.com/item/Volkswagen-VW-GTI-GOLF-5-MK5-Rabbit-2006-2007-2008-Door-Sill-Scuff-Plate-n-h/1481278236.htmlUnder Seat Drawers I have a full PDF guide for this installation if anyone needs me to email over. You can also refer to guide in the link
http://www.mk5golfgti.co.uk/forum/index.php/topic,54422.0/topicseen.html for part numbers and guide.
IMPORTANT – Do unplug your battery and don’t mess with airbag connection or it will go off like it did on mine. Now I need VCDS to turn light off!!
MORE IMPORTANT – I found €4.20 below the slide rails off the seat when I took them off!!
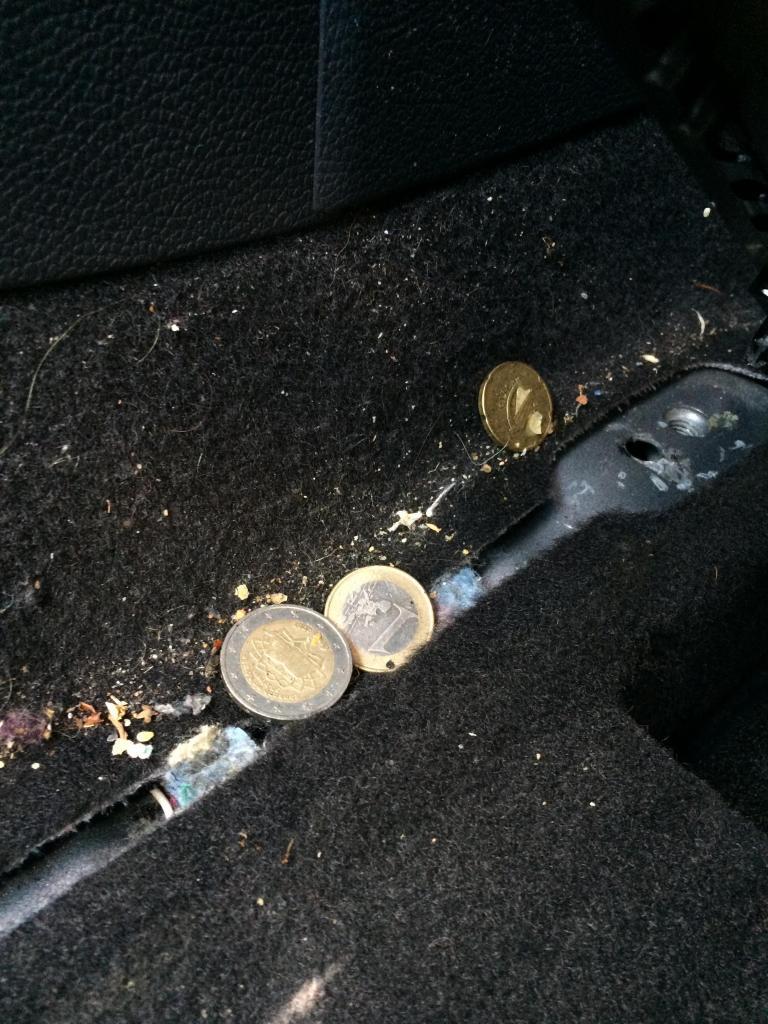
I couldn’t find the bit 10XZN needed to remove the 4 number bolts holding the seats in place so I used an M10 bolt head to catch the threads and worked perfectly.
I won’t go into detail on installation but it’s an easy fix and well worth it. I was cautious on the passenger side and took my time with everything but I completed the driver side the following night in less than 10 minutes.
Part Numbers:
Drawer
- 1K0 882 602J (Right)
- 1K0 882 601J (Left)
Colour Codes
3U6 = Art Grey
31X = latte
7G8 = Pure Beige
71N = Anthracite
Frame
- 1K0 882 599B 9B9 (Left)
- 1K0 882 600B 9B9 (Right)
Fittings Required Per Drawer
4x Screws = N 906 986 06
1x Screw = N 909 998 01
1x Bracket = 1K0 881 548A (right) & 1K0 881 547A (left)
2x Pop Rivets 4x8 = N 900 978 02
Engine Intake Cover This seems to be a very common issue with the GTI. The intake cover near the bonnet is only held in place with 2 small clips and comes off very easily. It’s a very quick fit and although there’s no real harm leaving it off it looks better aesthetically putting it back on.
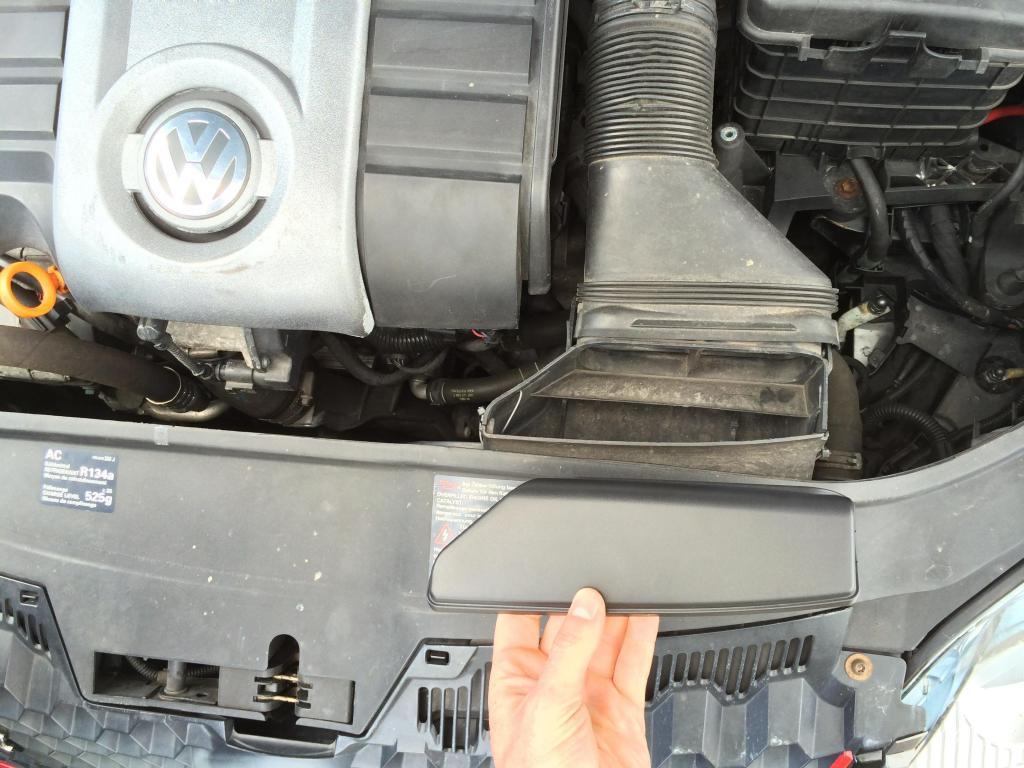
Part Number:
1K0 805 965 C
Rubber Engine Mounts As you call know rubber degrades over time so a lot of the rubber mounts on the car will need to be replaced. A common one is the 4 number rubber mounts the engine cover sits on to hold it in place. I took my engine cover off to paint and noticed a few were torn so I replaced for a few euro. Don’t have part numbers but your dealer can work off the following illustration.
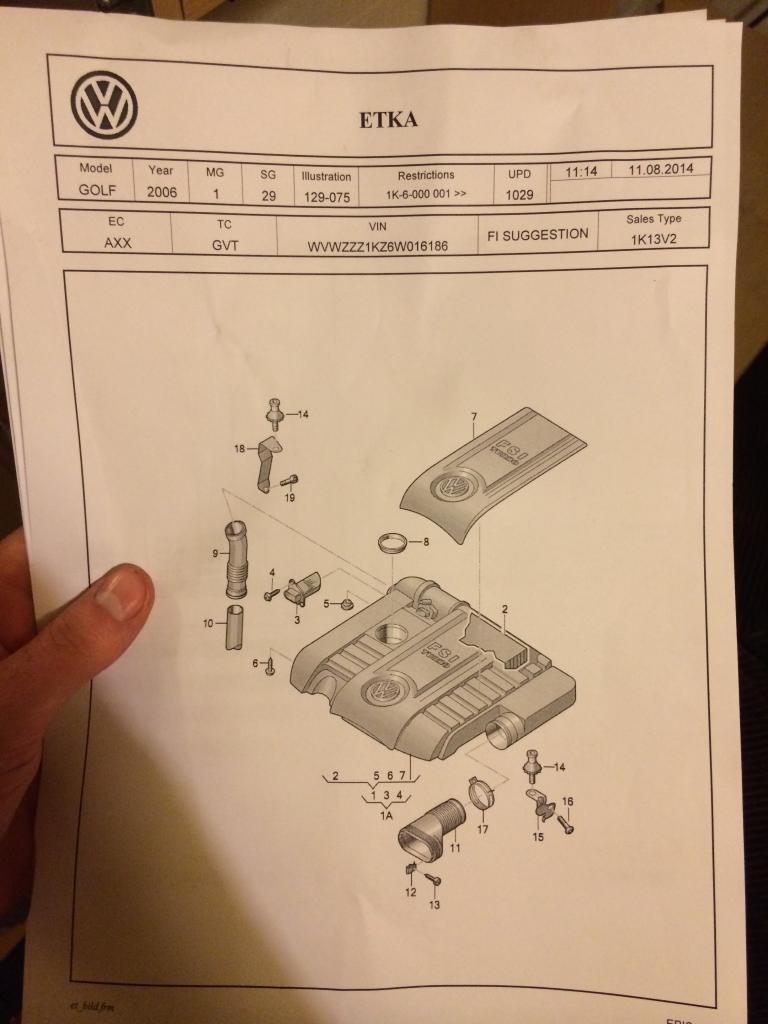
Illustration 129-075
Piece 5. While I was at it I also replaced piece 14 along with new bolts for the intake holder (Piece 12 and 13)
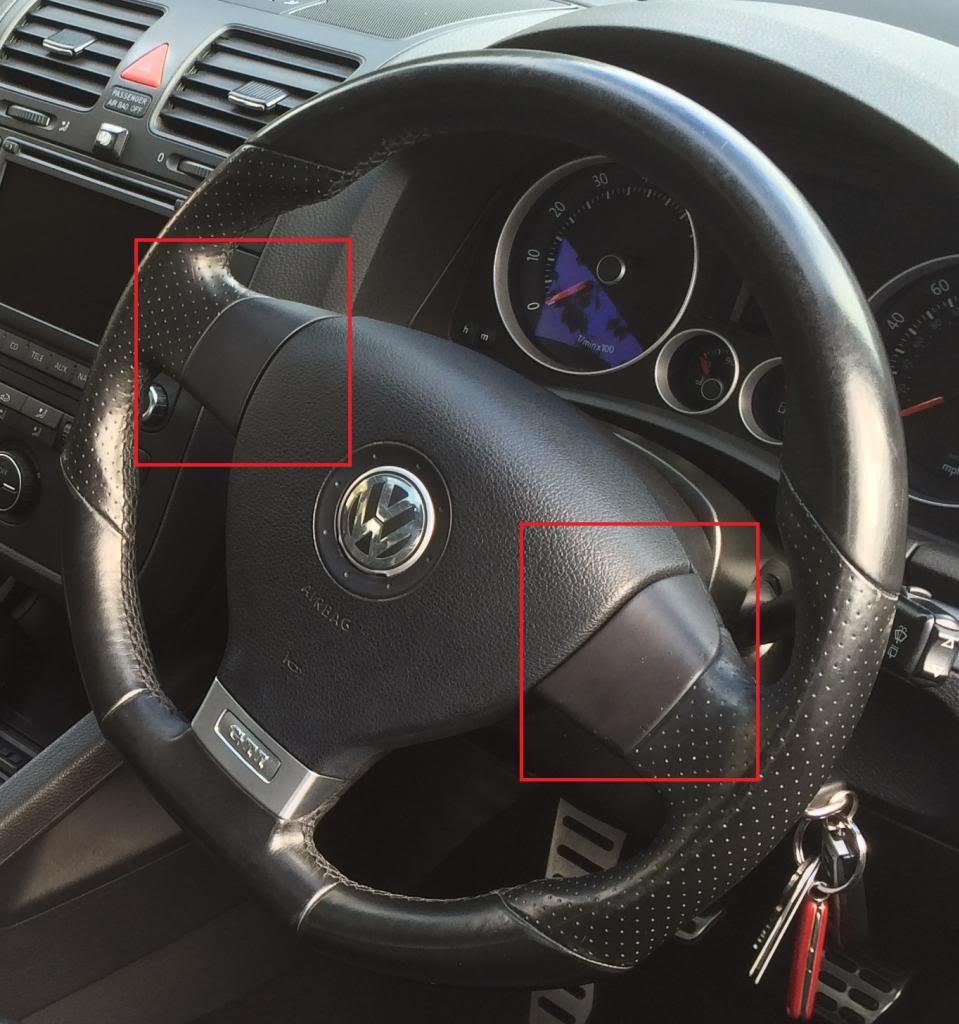
Steering Wheel Plastic Surrounds There are 2 piece of plastic either side of the horn on the steering wheel that have the same coating as the door handles. They show slight wear so I said I’d change them.
Part Numbers:
616 083 65
616 083 66
I was looking at the old ones thinking I could do something with them so I peeled off all of the old coating with my nail.
I then sanded them down with 600grit.
2 coats of colour match paint.
2 coats of clear lacquer.
They look much better than the original ones I just bought brand new
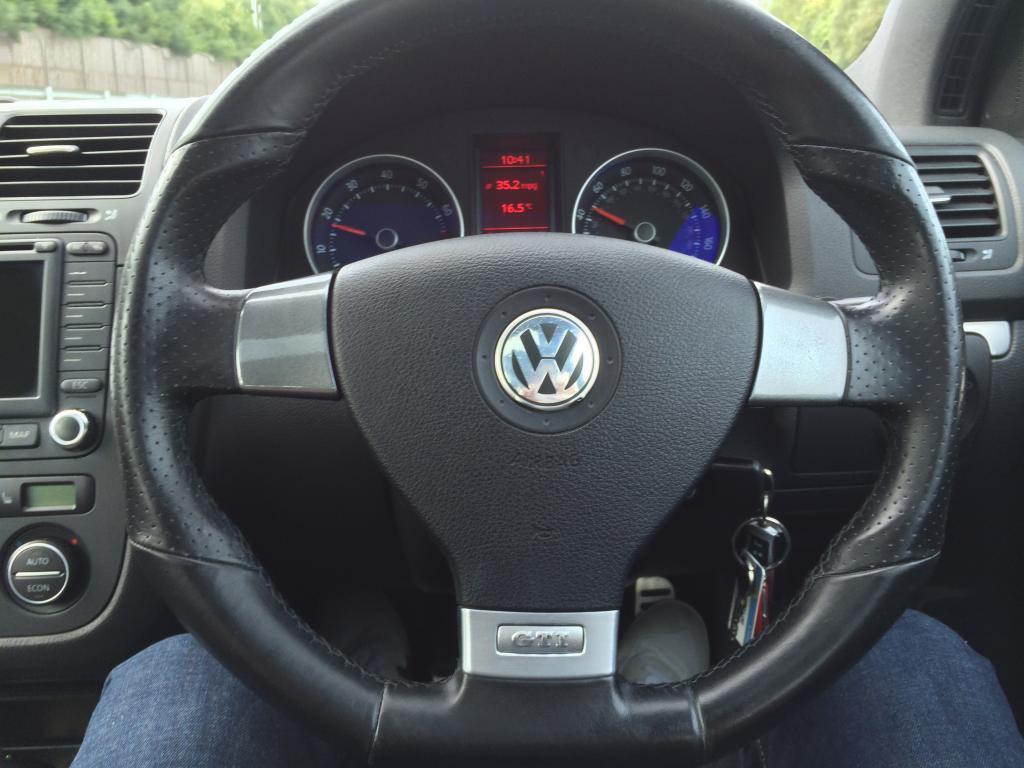
I now actually prefer these to the original ones so will put them back in storage.
Diverter Valve Replacement Let me start by saying I bought my car around 10 months before replacing DV. Since I bought the car with a torn DV and I hadn’t driven another GTI I didn’t even know it was gone because a 2L engine is still very powerful. Whenever I put the foot down I would hear a whistle which I was sure was my turbo but even though it pulled, it never pushed me to the back of the seat. After driving another GTI just last week I was reassured that something was definitely out of place so I said I’d tackle the DV. That loud whistle would have been the air escaping through the DV I imagine because I can’t hear it clearly anymore.
I can’t imagine how many people out there are driving around with torn DV’s completely unaware. My test – is it whistling loudly instead of pulling off & at around 2500rpm does it push you to the back of your chair or does it just lift a bit?
I ran my car through VCDS software and it came back with error code P0299 which is associated with low boost. I purchased the part from VW for €53 and fit it myself in around an hour.
Since I have a K03 my DV was located in behind the driver side wheel arch so this is how I replaced it.
Jack the car up as high as safely possible because you’re going to need a good bit of wiggle room. I then placed it on axle stands and chocked the wheels to be sure.
Remove the wheel and the plastic arch mud guards. There’s 2 of them and the one on the right hand side is also screwed onto the skid plate so you need to remove all of the screws at the front too.
The DV is located just inside the only bit of free space you can get to and I’ve circled it in the photos below.


A good tip is to get a small torch and tape it to one of the pipes so it’s not in your way but it’s providing you with better lighting. Will save time in the long run.
Start by removing the electrical connection. Prize clip up with flathead screwdriver and remove. Please do this safely or you’ll tear the wires. Now cable tie it to something higher so it’s not in your way.
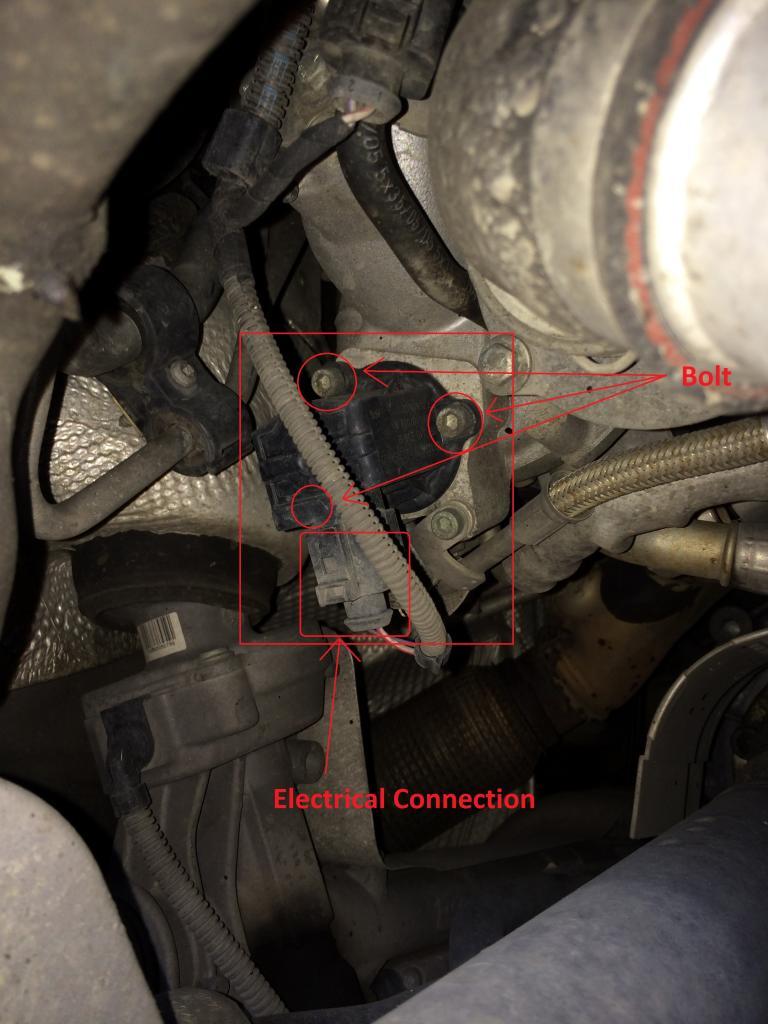
The 3 number bolts are held in place tight enough with threadlock – a glue put around bolts to keep them coming free from vibration so they require a bit more force to remove than a normal bolt would.
As long as you have the right tools all 3 bolts can be removed but you can’t tackle this with a bit set and a screwdriver. You really need the extension pieces, right angle adapter etc. for your socket set. The area is also very tight so you’re going to need the socket set to be quite small.
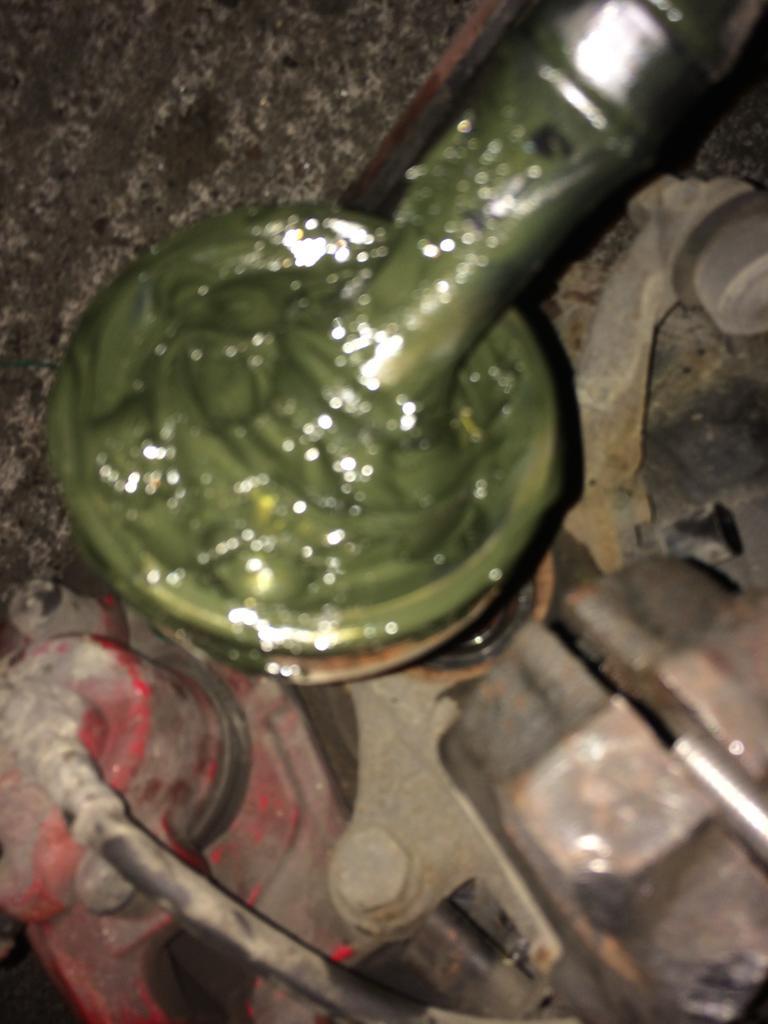
When you get the DV off inspect the rubber diaphragm for tears and what revision it might be. As you can see, mine was torn badly and a revision B.
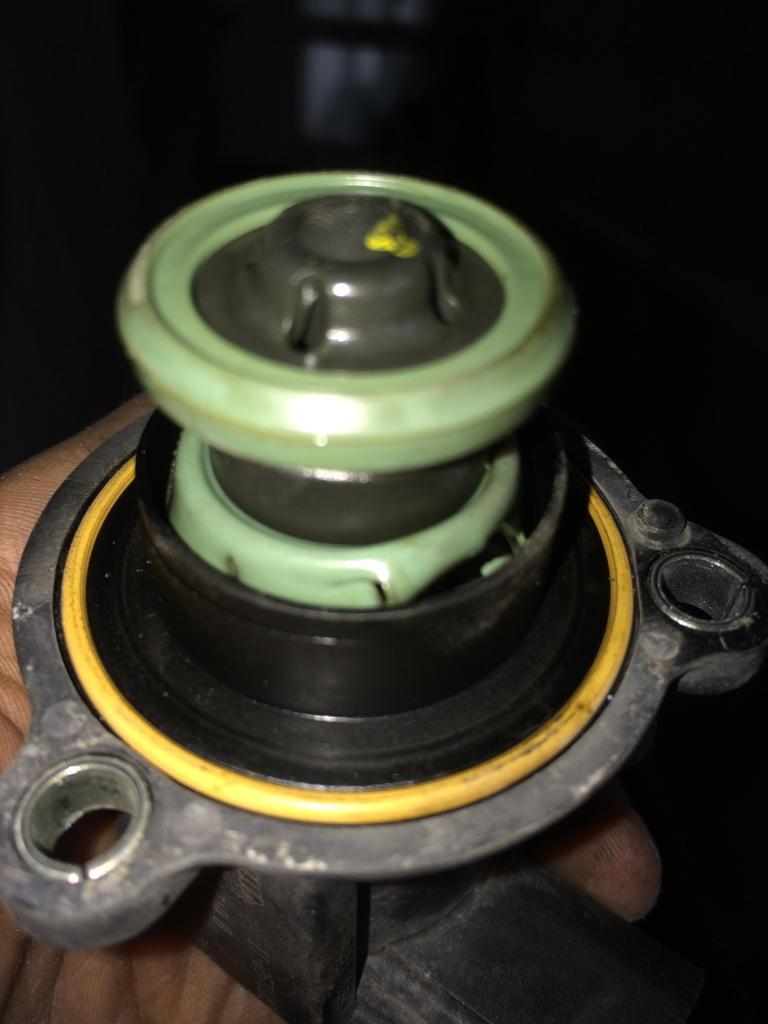
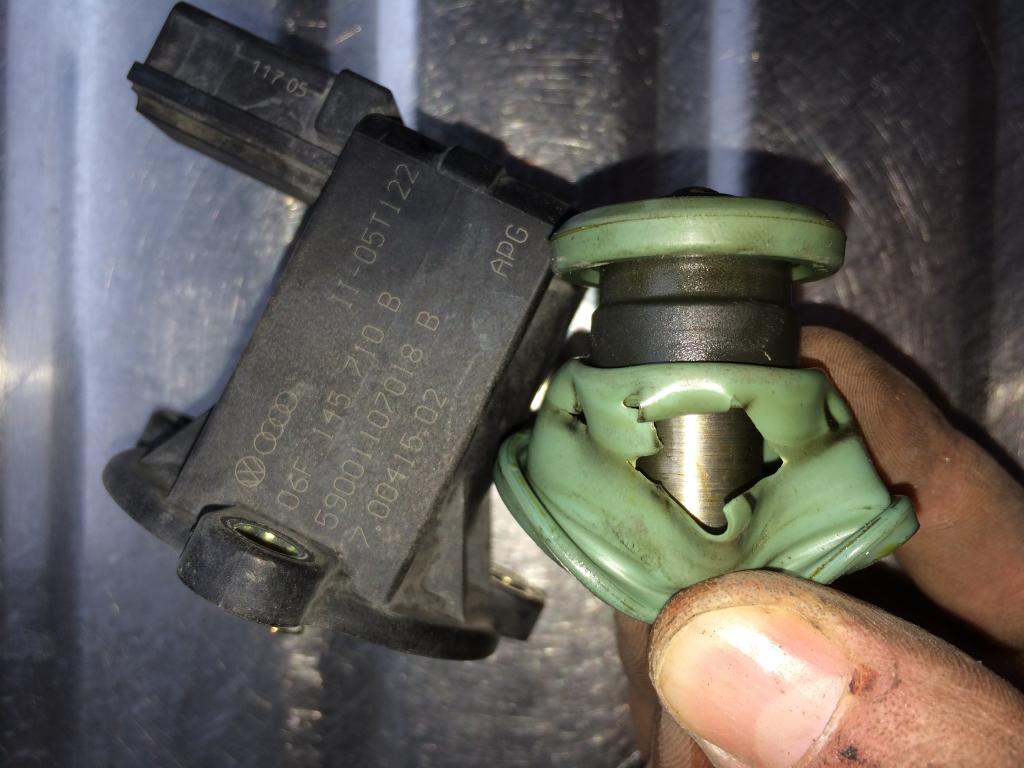
I replaced mine with a revision G. For the reinstallation start with the bolt on the top right corner. You’re going to need some fresh threadlock here on the bolts to keep them from coming out. Add a small amount and hold the DV in place with the first bolt. Don’t fully tighten until you get the other 2 bolts in.
NOTE: With the threadlock. Please buy a new bottle. A friend owns a Porsche and he was removing his inner cv joint recently which similarly to the golf is in held in place with 5 spline bolts. He put them back in with threadlock and a week later it fell out of the car as the threadlock was gone off! Get some new stuff!
Now fully tighten all 3 bolts and reconnect.
While you have this panel removed why not check your windscreen washer tank for dirt, your light bulbs need replacing? or your suspension need a look at?
Last but absolutely not least – clean the crap out of your panels now! I forgot to take photos but at the point where your side skirt meets your mudguard there’s a crevice there that can hold a mug full of sand/grit/leaves etc. Remove all of this junk and anything else that may have gotten behind the mudguard over the years. If you’re feeling fancy why not get the pressure washer out?
Now start putting it all back together. If you’re not sure where some parts/screws went you can walk over to the passenger side and use it for reference.
I got back in my car and I have to say I was happier about the car than I was the day I bought it. The power was like nothing I’ve ever experienced. The power is insane and I never even knew anything was wrong. I also know what symptoms to look for in the future so it ever did happen again I can fix it with ease.
Windscreen G1 Application & Wiper Blades I purchased a bottle of G1 windscreen water repellent and went at it the first dry day I got.
I gave the car a good clean followed by 2 goes of glass polish on the windscreen. Another clean of all the windows and I dried off with a microfiber cloth.
I then applied 1 coat of G1 to all windows followed by an additional 2 coats on the front windscreen.
I removed the residue with the other bottle and then buffed off using microfiber.
I went for a spin that night and thankfully it rained. I actually got my passenger to record it too. I let the rain build up as I was travelling around 30km/hr. When the window was saturated I gave it a little bit of juice to 60km/hr or so and you could see the water just rolled right off and I never needed wipers.
I figured it worked so well I went ahead and installed a brand new set of wiper blades while I was there.

An update on this, it has been 3 months and it’s amazing still. Once I hit the motorway all of the water glides off and I haven’t used my wipers in continuous mode since applying, not even once! I just do a manual stroke every few minutes when it builds up at slower speeds!
Outer CV Boot Replacement & Suspension Bearings I left my car in for it’s full service with VW and they let me know my passenger side CV was weeping so I picked up a new boot for around €20 and tackled myself in a few hours.
Coincidentally my driver side boot failed a week later so I have since replaced that also!
I decided while I was doing this to check my strut mount bearings and the shock absorbers so I did both jobs together.
You need a special tool here to secure the clips onto the CV boot. Get this now or don’t tackle the job.
This isn’t a full how to guide, it’s just a basic overall as I’m bound to have forgotten a few bits. It’s just to give those who have the same problem an idea of the work involved before they make their decision. Overall time for an untrained mechanic is about 6 hours.
Before you lift the car remove the wheel centre cap and unscrew the driveshaft centre bolt just a quarter turn along with the 5 bolts holding the wheel in place.
Start by jacking the car as high as you can to give a good working area. Apply axle stands and wooden chocks.
Remove wheel. Now if you have forgotten to loosen the centre bolt earlier on fear not. Put a flat head screwdriver in between the brake disc and the caliper and you can turn the bolt now without the shaft turning.
Remove the 3 bolts holding in place the wishbone.

Now get the driveshaft out of the wheel hub. I put a socket into the hub and gave it a bang to push it out of place.
Get the hub to one side and hold it propped up. Disconnect all connections.

Move the driveshaft to the other side and prop it up with a rope. Don’t let the CV joint rest under it’s own weight.
NOTE: Remove the headlight level sensor and switch!!!! It’s connected to the wishbone and the frame with M10 nuts.
At this point I diverge to tackle the suspension. If you don’t need to then continue with work on CV and disregard below points on suspension.
Remove the bolt holding the suspension to the hub. You need a special tool to spread the frame surrounding the suspension to remove it. I put an allen key in the gap and twisted it, then banged a bolt into the space to keep it open. Now a few taps with a hammer and it should come off.

Again keep the wheel hub propped. Remove the 3 bolts inside the engine bay to release the suspension. Compress springs, check bearings, top mount and shock absorber. All was ok and in good conditions so back in it went!

Now get the old boot off with a Stanley blade. Remove old clips with a snips. Clear off as much grease as you can.

I only needed to change my outer CV boot so I removed the joint in situ. If you need to change inner CV boot I suggest removing outer CV joint from a vice. The inner CV joint is held in place with 5 number spline bits threadlocked to death!
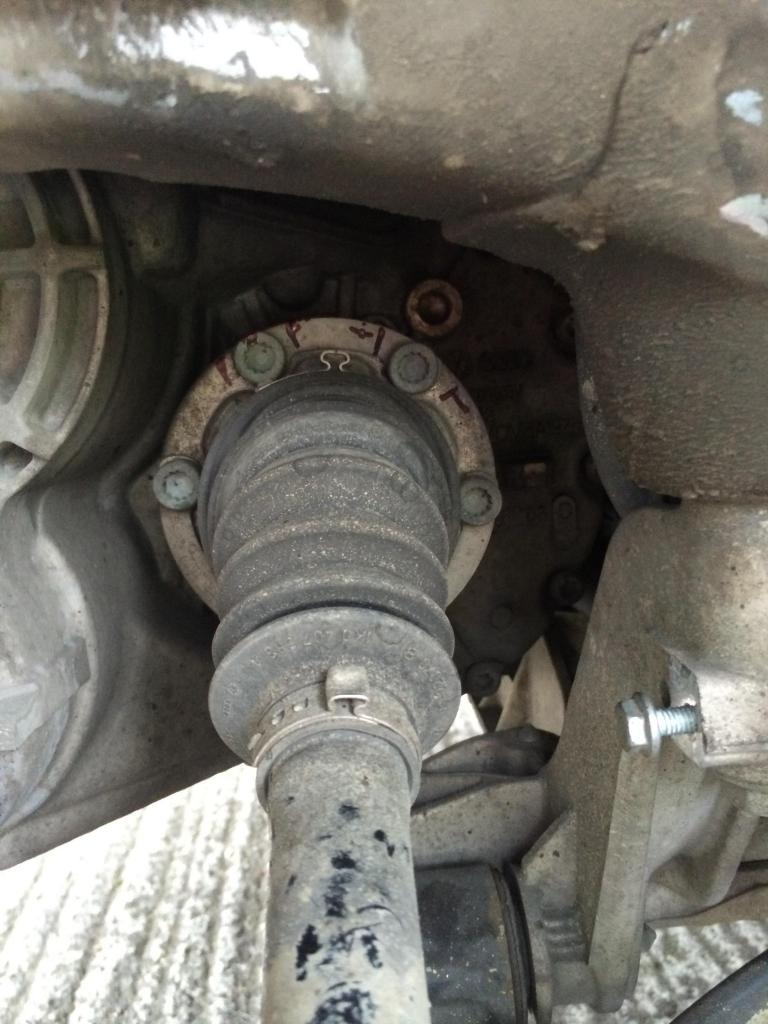
Now I have my old boot off and the joint is visible. Start watching youtube videos on how to do this but basically you tilt the joint to one side to gain visible access to the joint. Give it a good thump with a hammer and the joint will come off. You need to hold the inner joint in place at the same time. Just learn about this beforehand and don’t beat away with a hammer thinking it’s fine!!
Now I have my old joint off. Remove old grease and check for damage. Now pump it full of new grease.
Put the washers etc. back in the way you found them and put the first clip on. Now slip on new boot. Line up cv joint onto splines and hammer home. Secure both clips with a specialist tool.
Putting it back together is handy enough. Lining up the splines and pulling them into the wheel hub was a pain so I got them somewhat lined up and poked a bar into the middle to raise it to the right height. I then put a bolt into it and tightened it to pull the driveshaft into place.

