Make a donation

Author Topic: Graphite Blue GTI Build Thread  (Read 5142 times)

Offline mk1_dave

  • Just Arrived
  • **
  • Thank You
  • -Given: 0
  • -Receive: 2
  • Posts: 22
Graphite Blue GTI Build Thread
« on: July 04, 2023, 11:25:41 am »
Hello Everyone, been on this forum a while but never posted anything so thought it was about time. :grin:

Have owned a few diesel mk5/6s and finally settled on the GTI as my new daily. Don't have much plans at the minute other than checking everything over and replacing some worn out parts before the salty scottish winter arrives.

Spec when I bought the car:
3 Door
Manual
Heated Seats
Sunroof
Highline
MFSW

Current Spec

Interior:
Heated Seats
Sunroof
Highline Clocks
MFSW
RCD330 - with rear USB/steering wheel controls
Flip Badge Reversing Camera
Under Seat Storage Drawers
Door Puddle Lights

Exterior:
Genuine BBS CH028 Wheels
Genuine R32/Edition 30 Rear Lights
Edition 30 Rear Bumper
Genuine Shark Fin Aerial
Genuine Xenon Headlights

Suspension/Brakes:
BC Racing BR Coilovers with Coilover Socks
Hardrace Adjustable Front Anti Roll Bar
S3 Aluminium Front Hubs
S3 Aluminium Front Wishbones
Powerflex Anti Lift Kit
Superpro Polybush Wishbones/Steering Rack
BC Racing Drop Links
S3 Lower Ball Joints
Refurbished Gen2 Steering Rack
VW Golf MK7 GTi Performance Pack Brake Calipers
Ferodo DS2500 Brake Pads
Pagid Discs
Motul RBF660 Brake Fluid
HEL Braided Brake Lines
Vibra Technics Subframe Mount
Subframe Deadset Kit
R32 Rear Brake Calipers
EBC Yellowstuff Pads
Pagid Discs

Performance:
Trackslag 3" Non Resonated Cat Back Exhaust
Direnza Cold Air Intake
Powerflex Engine/Gearbox Mount Inserts
Runnerflap Delete
R8 Coilpacks
More coming soon  :happy2:


Don't have any pictures of when I bought it but here's a few after using a headlight restoration kit to bring the headlights back to life and giving the full car a machine polish:


« Last Edit: March 26, 2024, 11:00:06 am by mk1_dave »

Offline jacksosi

  • Always Involved
  • ****
  • Thank You
  • -Given: 2
  • -Receive: 2
  • Posts: 57
    • Email
Re: Graphite Blue GTI Build Thread
« Reply #1 on: July 04, 2023, 11:33:02 pm »
Nice colour, bodywork looks great. and would love a sunroof in ours.

Get some black trim restorer on the rear bumper , and some tyre slick and it will look even better
Black MkV Gti (Nov 2008), no modifications

Offline mk1_dave

  • Just Arrived
  • **
  • Thank You
  • -Given: 0
  • -Receive: 2
  • Posts: 22
Re: Graphite Blue GTI Build Thread
« Reply #2 on: July 05, 2023, 10:34:55 am »
Nice colour, bodywork looks great. and would love a sunroof in ours.

Get some black trim restorer on the rear bumper , and some tyre slick and it will look even better

I was suprsied finding this one reasonably cheap with the bodywork in such good condition. Underside is pretty rust free aswell which is a bonus.

Definitely my favourite colour on a mk5 and this being my second one in graphite blue I really wanted one with a sunroof.

Ended up getting rid of the towbar and changing the bumper..  :wink:


Offline mk1_dave

  • Just Arrived
  • **
  • Thank You
  • -Given: 0
  • -Receive: 2
  • Posts: 22
Re: Graphite Blue GTI Build Thread
« Reply #3 on: July 05, 2023, 10:52:40 am »
After picking up the car it had a few issues and things that needed sorting out such as a misfire, rough idle, eml, blowing exhaust and some worn engine mounts so got to work on sorting all that out.

Replaced the following parts in an effort to fix some of the fault codes the car had when I picked it up:

Geabox and Engine mounts
Powerflex void inserts
Powerflex dogbone insert
PCV
DV
Boost pipe seals
Dipstick pipe and o-ring
Inlet manifold gasket
Throttle body gasket
Valve cover gasket
R8 coil packs
Spark plugs
New cold air intake
Thermostat
MAF

Here's a picture mid way through cleaning the carbon build up on the valves


Sent the injectors off to R-Tech as I thought that could be the source of the misfire and after seeing the amount of carbon they deserved a clean. Injectors came back the next day with new baskets, seals and flowing much better. Such a fast easy service using R-Tech, would definitely recommend for anyone that needs their injectors serviced.

With the engine in bits thought it was the best time to take the sump off and check the pickup pipe and have a look to see if there was anything untowards floating around in the oil as I didn't get much information of any services carried out recently.


The pickup pipe had 1 or 2 small pieces of what felt like plastic which was mostly likely from the brittle gaskets on the valve cover, swapped this out for a new pipe and seal from VW and sealed the sump back up after giving it a good clean.

After changing all of the parts the car runs great now and no EML after around 2-3 thousand miles.  :jumping:

I opted for the Direnza intake as it was the cheapest one I could get at the time to replace the old one that had holes and the mount snapped off, might look at upgrading this one at some point if it turns out to be poor quality.

Current picture of what the engine bay looks like now


Offline mk1_dave

  • Just Arrived
  • **
  • Thank You
  • -Given: 0
  • -Receive: 2
  • Posts: 22
Re: Graphite Blue GTI Build Thread
« Reply #4 on: July 10, 2023, 08:18:33 pm »
First interior mod I done was fitting the optional extra under seat storage trays, been looking for a little more space to keep things in the cabin so opted for these.

Here's the parts list if anyone's interested - the brackets are optional as I heard from a few people you that they work fine without them but I got them anyway as they weren't too expensive.

The drawers and frames were over £200 new from VW, I ended up finding a set from a breaker on eBay but they aren't easy to come by.

Drawers
Part Number:
- 1K0 882 602J (Right)
- 1K0 882 601J (Left)

Glide frame
Part Number:
- 1K0 882 599B 9B9 (Left)
- 1K0 882 600B 9B9 (Right)

Fixings (per side)

4x Screws = N 906 986 06
1x Screw = N 909 998 01
1x Bracket = 1K0 881 548A (right) & 1K0 881 547A (left)
2x Pop Rivets 4x8 = N 900 978 02

Really simple install, here's a link to the guide I used:
https://www.mk5golfgti.co.uk/forum/index.php?topic=54422.0

Few pictures of them when I was fitting them and after insall:


Offline mk1_dave

  • Just Arrived
  • **
  • Thank You
  • -Given: 0
  • -Receive: 2
  • Posts: 22
Re: Graphite Blue GTI Build Thread
« Reply #5 on: July 18, 2023, 09:09:41 pm »
Fitted a new exhaust as the old original one had a few holes and was past its best, after looking for a while I decided to get a cat back system from TrackSlag as their reviews were really good.

Fitting was simple just had to take a small amount off the end of the downpipe, and replace the old exhaust clamp.


There is lots of adjustability with this exhaust which is great as you can position the tips to your own preference, which is also handy if you end up getting a different bumper which I did after fitting the exhaust.

Its quiet on idle but can be quite loud when accelerating and I still have the original cat installed. Very good build quality and comes with an extra mount that ties into the rear subframe. No rattles, leaks or odd noises after a few thousand miles of driving.

Offline mk1_dave

  • Just Arrived
  • **
  • Thank You
  • -Given: 0
  • -Receive: 2
  • Posts: 22
Re: Graphite Blue GTI Build Thread
« Reply #6 on: October 09, 2023, 05:50:48 pm »
Been a while since my last update, have still been chipping away at the GTI.

Recently installed a fresh set of R32 rear calipers and carriers along side some new pagid discs and EBC yellowstuff pads. Caliper and carrier install was straight forward enough and they bled up great. Thought it was the ideal time to replace the hand brake cables as noticed that one was stretched. Getting the old cables out the aluminum pipes was abit of a pain but managed to pull the cables and cut them which meant I could drill out the plastic part of the cable that was stuck in the pipe. Have done around 1500 miles on the new calipers and can't complain..

Next on the list for the brakes is a set of braided lines and some fresh front calipers as they have seen better days too.


Offline mk1_dave

  • Just Arrived
  • **
  • Thank You
  • -Given: 0
  • -Receive: 2
  • Posts: 22
Re: Graphite Blue GTI Build Thread
« Reply #7 on: October 09, 2023, 06:03:01 pm »
Got rid of the towbar and fitted an aftermarket edition 30 lower diffuser as I couldn't find any genuine bumpers close to me. Fitment isn't the best as expected but will do until I find a genuine bumper. Some pictures from the odd sunny days in Scotland :grin:


Offline mk1_dave

  • Just Arrived
  • **
  • Thank You
  • -Given: 0
  • -Receive: 2
  • Posts: 22
Re: Graphite Blue GTI Build Thread
« Reply #8 on: February 29, 2024, 04:12:19 pm »
Picked up a set of genuine xenon headlights that were in good condition. Lenses had a few small scratches on them so decided to sand them back to a smooth surface then clear coat them, turned out really good after a few hours spent on them.

Decided it was time to get rid of the old suspension as it was looking past its best and one of the rear springs had snapped. Went for a set of BC Racing coilovers as I have them on my other cars and have been great fun.

Few pictures of the BC's after installing them and the only picture I could find of the headlights fitted to the car!


Offline mk1_dave

  • Just Arrived
  • **
  • Thank You
  • -Given: 0
  • -Receive: 2
  • Posts: 22
Re: Graphite Blue GTI Build Thread
« Reply #9 on: March 01, 2024, 04:12:32 pm »
Over the last few months I had been gathering parts to give the front of the car a major overhaul which included all new bushes, bearings, brakes and suspension components. I also had a rattle coming from the front of the car that sounded like it was coming from the steering rack, due to this it was the perfect time to install a refurbished rack while everything was off the car. I also stripped both front wheel arches and the underside of the floor back to bare metal to make sure there was no rust and also keep it nice and fresh as I daily the car in the salty Scottish winters. I used buzzweld zinc primer, buzzweld stripe coat and finally tintable Upol Raptor.

List of new parts installed:
Powerflex anti lift kit
S3 lower wishbones with superpro bushes
S3 Alloy hubs with new FAG bearings
S3 Lower ball joints
New track rod ends
CVP Subframe deadset kit
Refurbished Gen 2 steering rack
Powerflex steering rack bushes
Whiteline adjustable anti roll bar
Vibra Technics subframe bush
New dogbone mount
MK7 GTi Performance Pack brake calipers
Pagid discs
Ferodo ds2500 pads
HEL braided brake lines
Motul RBF660 fluid
BC Racing drop links
OEM brake disc guards
All new bolts and screws including c clips, arch grommets

Also managed to pick up a set of genuine BBS CH028's in good condition. Was going to get them refurbished as I don't really think the gloss black goes with the graphite blue but this will be a job for nearer the summer.

After installing all of the above the car handles so much better and the stopping power is incredible. The noise/vibration is definitely noticeable after installing the vibra technic bush but isn't horrendous.

Have been driving the car for the last few weeks and is filthy again, will get some pictures of the progress once I get a chance to wash it.

Enjoy some pictures of the rebuild process  :laugh:


Offline Mekaniko

  • Always Involved
  • ****
  • Thank You
  • -Given: 6
  • -Receive: 2
  • Posts: 113
Re: Graphite Blue GTI Build Thread
« Reply #10 on: March 11, 2024, 03:06:12 pm »
Thank you for sharing all the new stuff. 4 years ago I replaced my lower wishbones for the OEM ones and I should had gone for the S3 ones.

All this parts fitted together at the same time you should feel it as a completely different/better car.

Offline mk1_dave

  • Just Arrived
  • **
  • Thank You
  • -Given: 0
  • -Receive: 2
  • Posts: 22
Re: Graphite Blue GTI Build Thread
« Reply #11 on: March 26, 2024, 10:37:14 am »
Another update..

Have never liked the look of the original pole style aerial so picked up an original mk5 shark fin, sanded it and painted to match the lc5f paint. Came out pretty good and colour match is good.

I also bought a flip badge reversing camera as I knew I would have some of the trim off to fit the aerial. The reversing camera is really good quality and was pretty easy to install. You have to take off the boot trim, rear door card, some parts of the dashboard and of course the radio. I took the rear bench out at the same time so I could clean under them and would give me better access to get the door card out. The wiring was easy once you get the wires through the rubber grommet in the boot. I taped the wire to a cable tie then once I got a small section in I used some spray grease to help as the grommet doesn't have much space for the extra wires.

The badge looks much cleaner and has a drain hole that lets the water and dirt get out of the badge recess also comes with a rubber pipe to allow you to direct the water to the drain hole in the boot, if vw done this from the factory I doubt there would be as many rusty boot lids!

Decided to delete the rear wiper when I had everything off as I never use it. Ended up blocking off the screen wash pipe but I'm planning on buying one of the wiper stalks that came on the cars that don't have a rear wiper then this will solve the issue of accidentally hitting the screen wash.

Next on the list is new speakers, an amp and a new front bumper if I can find one in Scotland for a decent price.

Still not a fan of gloss black wheels but here's a couple of updated pictures of how the car sits at the minute.


« Last Edit: March 26, 2024, 11:04:22 am by mk1_dave »

Offline mk1_dave

  • Just Arrived
  • **
  • Thank You
  • -Given: 0
  • -Receive: 2
  • Posts: 22
Re: Graphite Blue GTI Build Thread
« Reply #12 on: July 19, 2024, 04:08:33 pm »
Been a while since the last update.. I have spent way more hours than I wanted on doing this but here goes.

I was trying to find a knocking noise from the front end of the car after installing the BC Racing coilovers and had changed virtually everything and still couldn't get rid of it. I reached out to BC Racing to see if they could inspect them for any dampening issues or faults. While BC agreed to look into the issue I had a great idea of fixing any rust on the sills/arch areas of the car. I had a few small rust bubbles on the lower door shuts and I had abit of surface rust behind the drivers wheel arch liner at the front end of the sill. I knew there would be more to find when taking off the side skirts from all the rust posts I have seen in the past. I was quoted 3 weeks for BC to have a response and for me to get them back so I could use the car again.

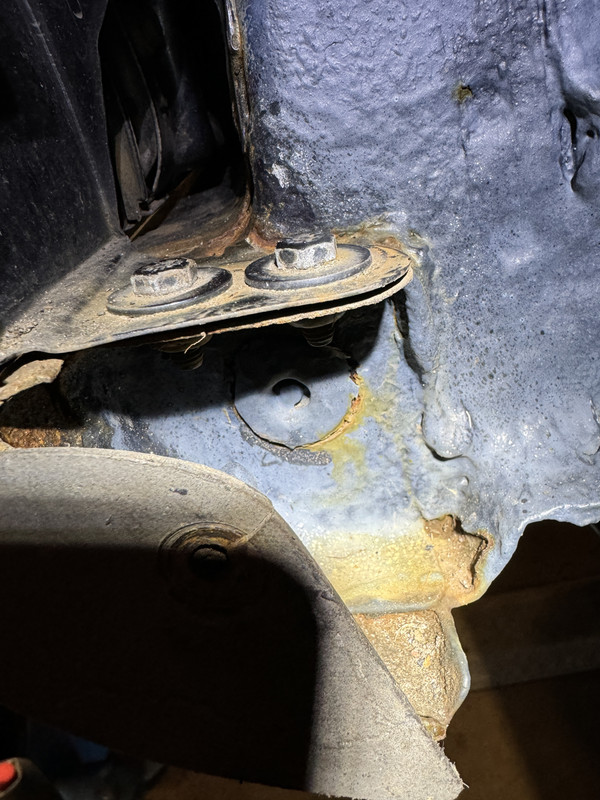
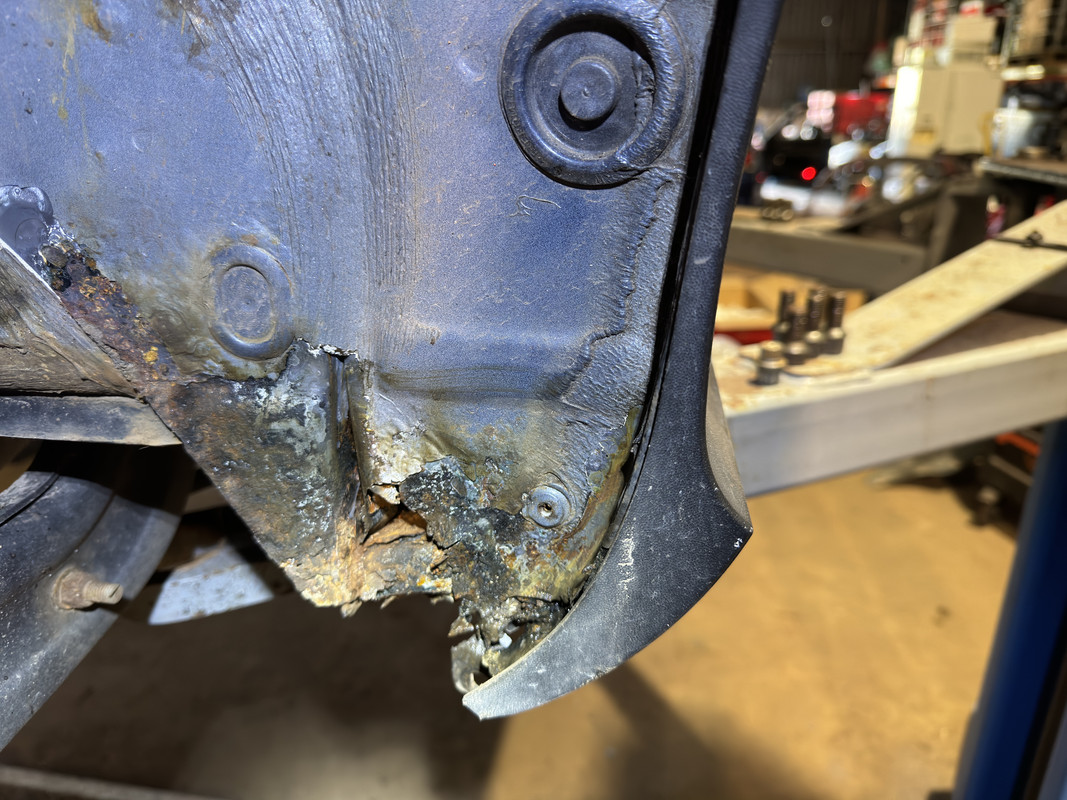
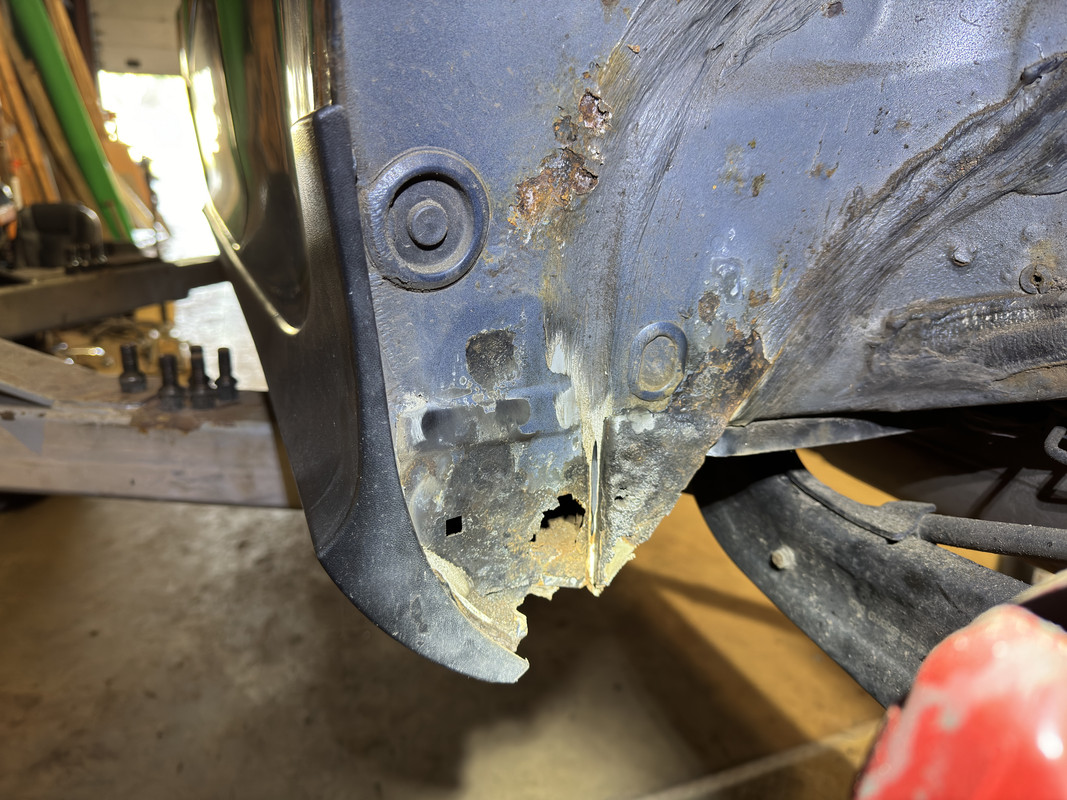
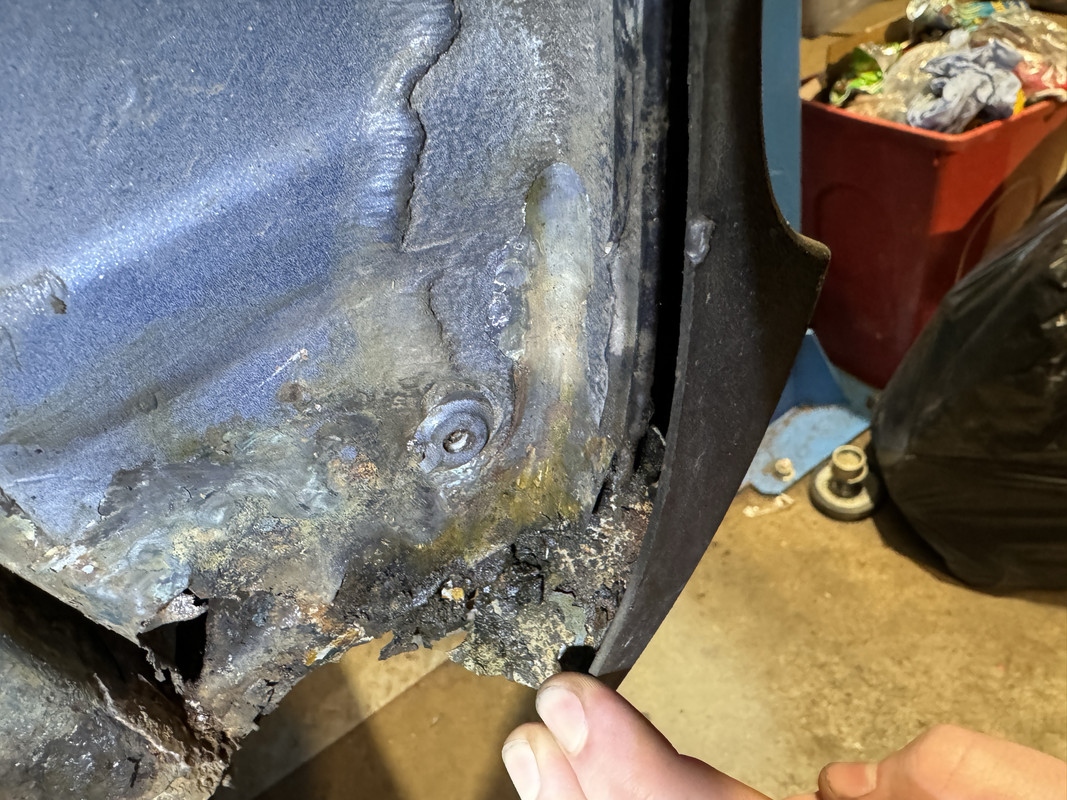
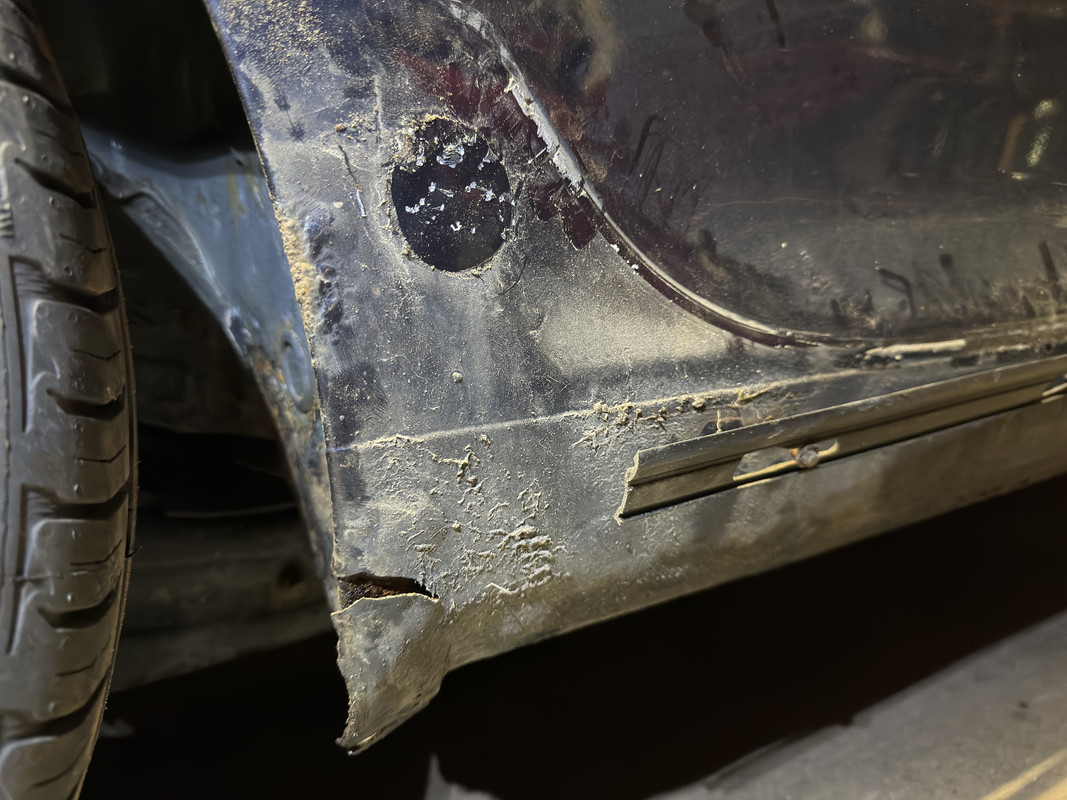
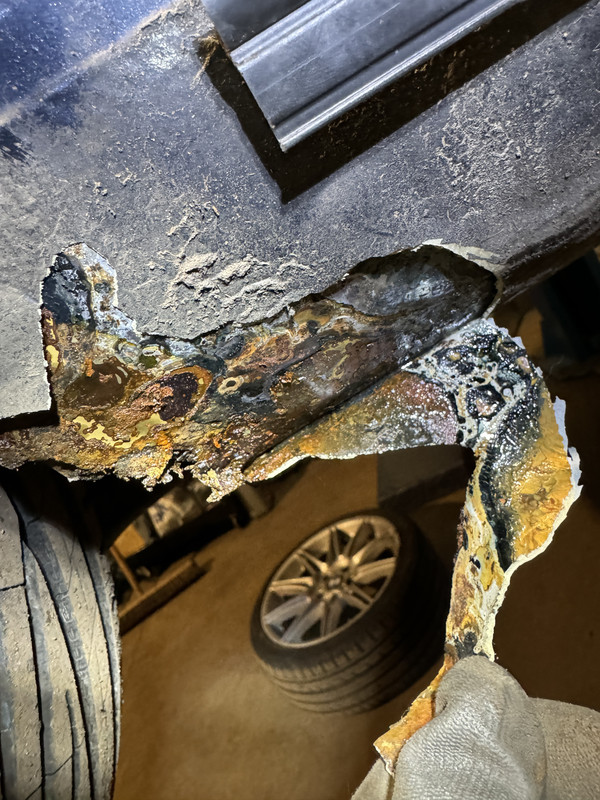
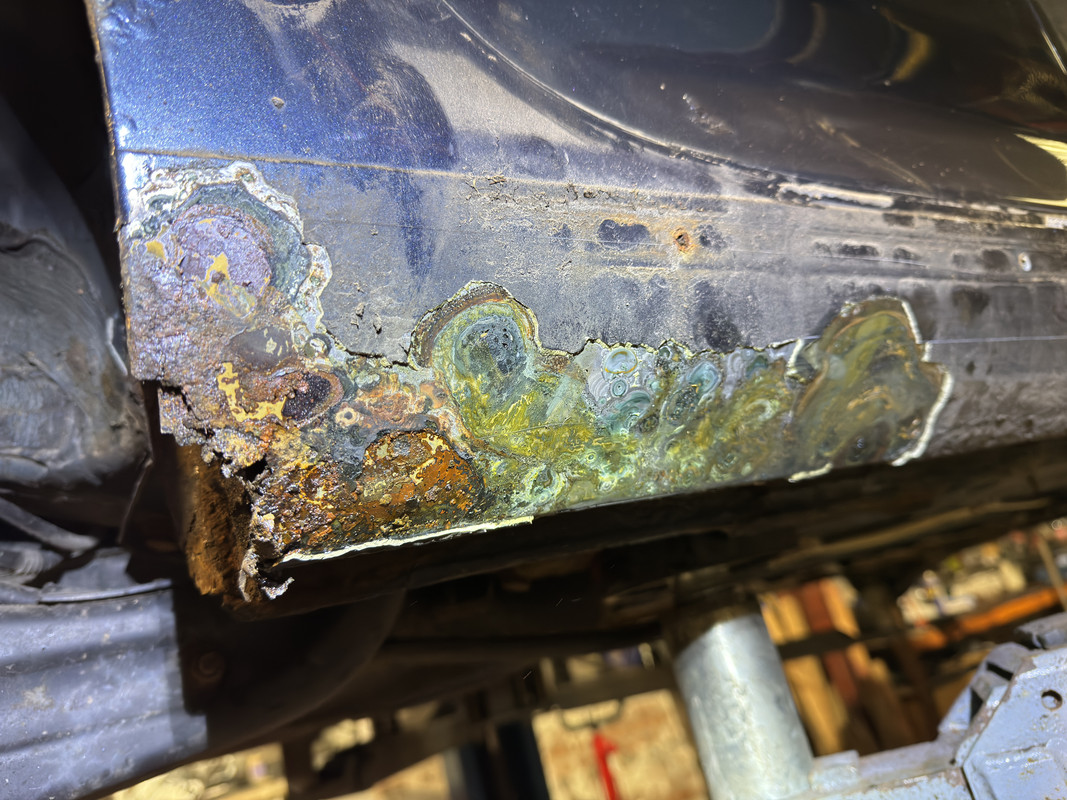
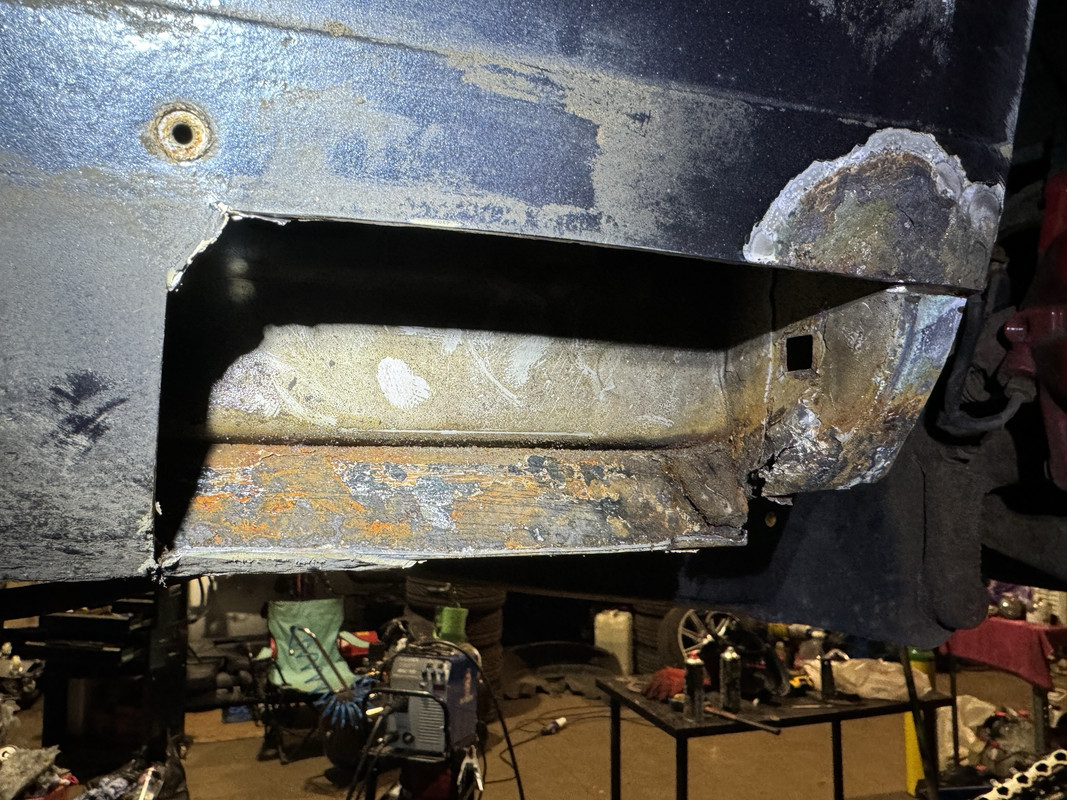
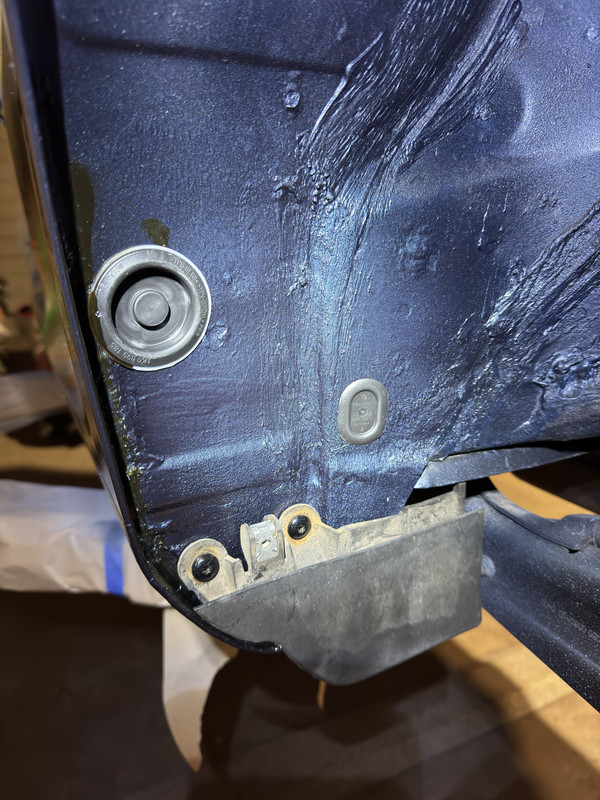
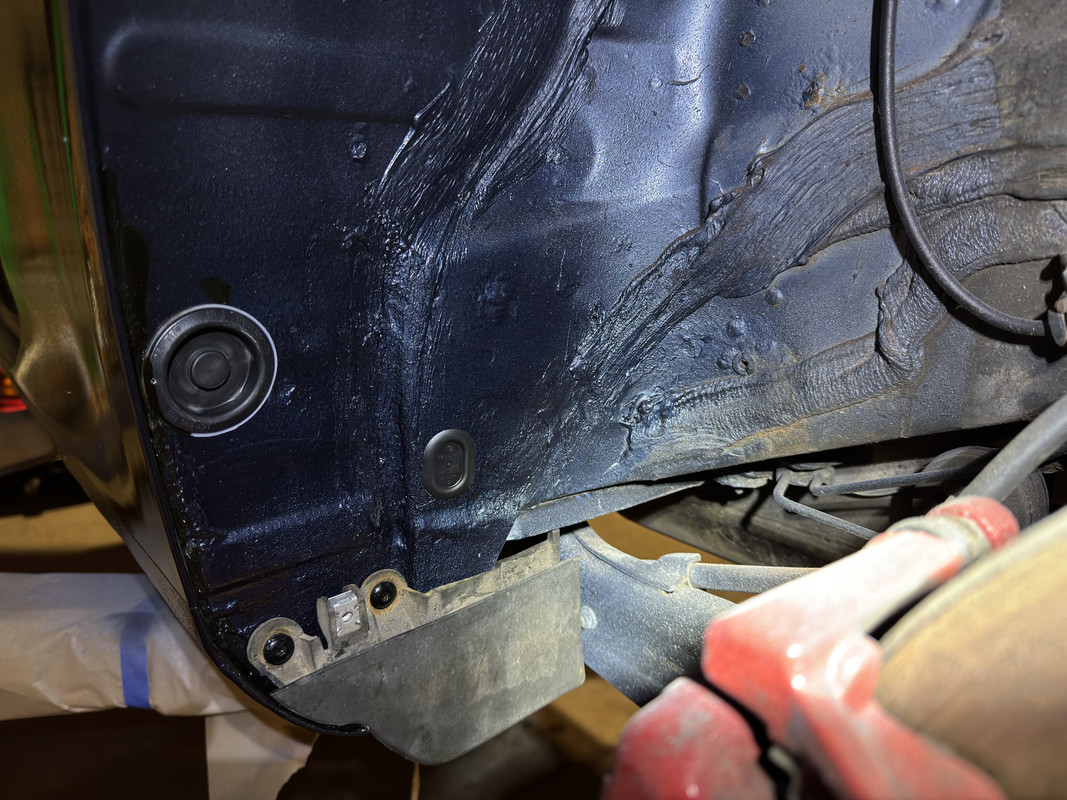
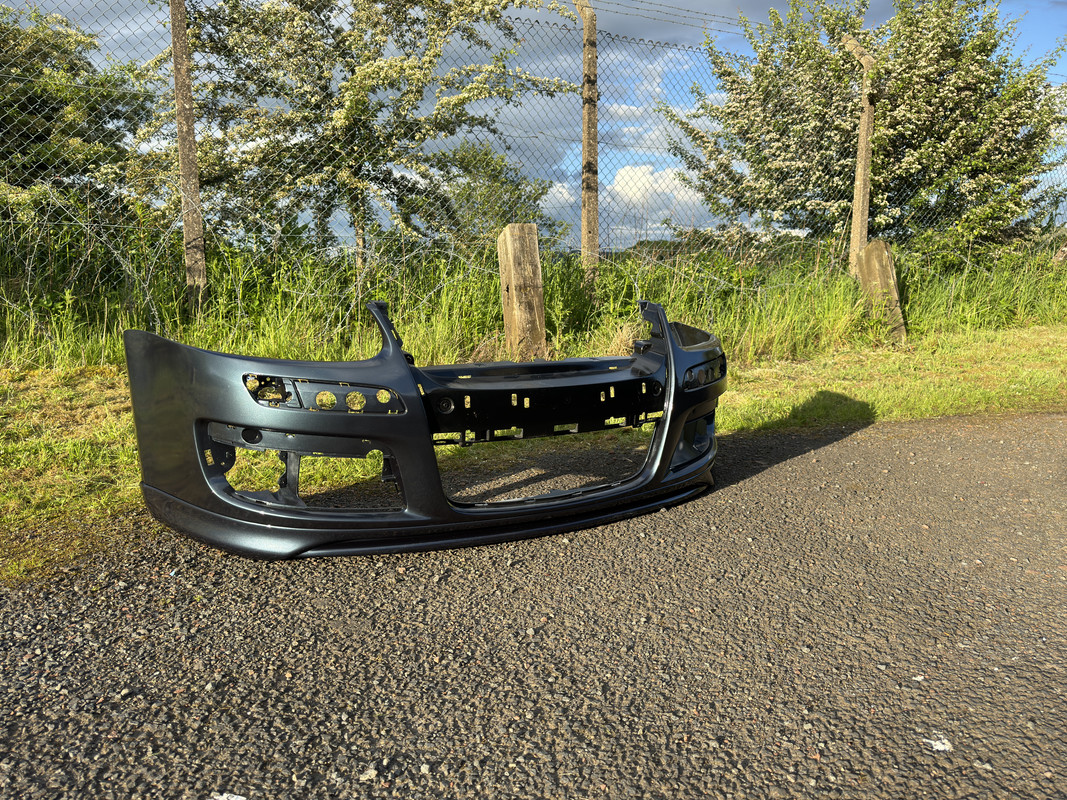
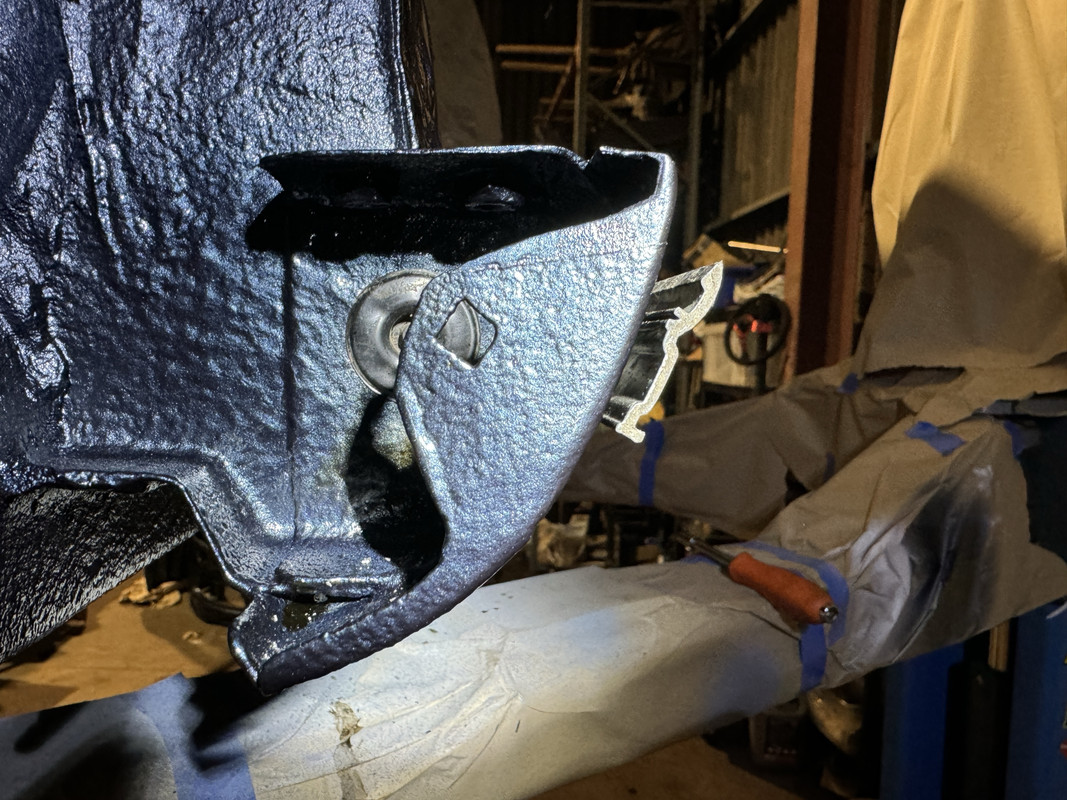
So firstly I started to strip the front bumper off and wheel arch liners. My old bumper had a crack and wasn't in good condition so I managed to pick up another bumper that was in decent condition. I then took off the side skirts which revealed rust at the back of the sills and the lower inner arch area. The original underseal had started to crack and was holding alot of water and dirt. Once I started peeling some of it off it was apparent that it had to be completely removed and start from scratch. There was lots of areas that had 0 signs of rust or water but as soon as you poked the underseal with a pick tool you could see the water starting to drip out in places.

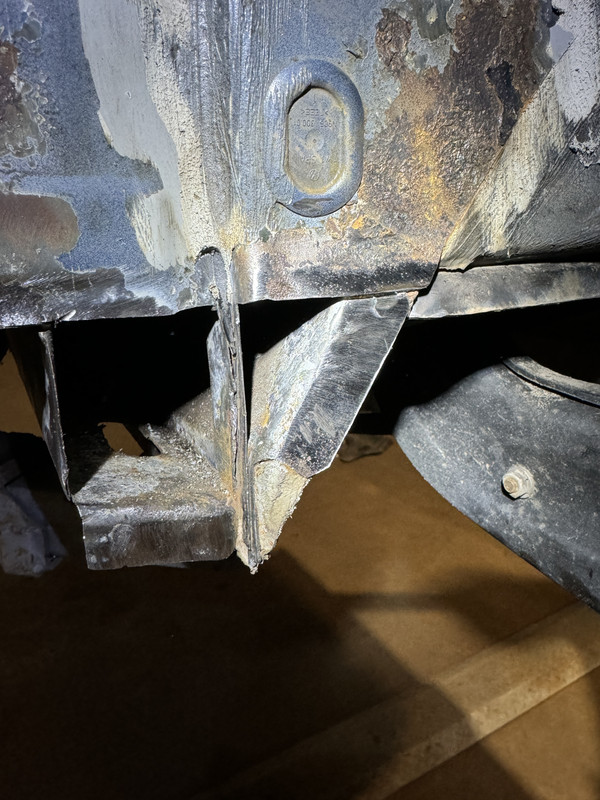
I ended up cutting out all of the rust which was both rear sills and lower inner arch panels, and the front of the drivers sill. Once I had all the rust cut out I found there to be two bags full of foam that sits between the rear quarter and the rear metal behind the door cards. While the foam was in a sealed plastic bag it was soaking wet and meant that any water that got in the sill would be stuck at the back end of the car. I know car manufacturers do this alot but not really sure why? My 1992 Mr2 Turbo has a similar issue.

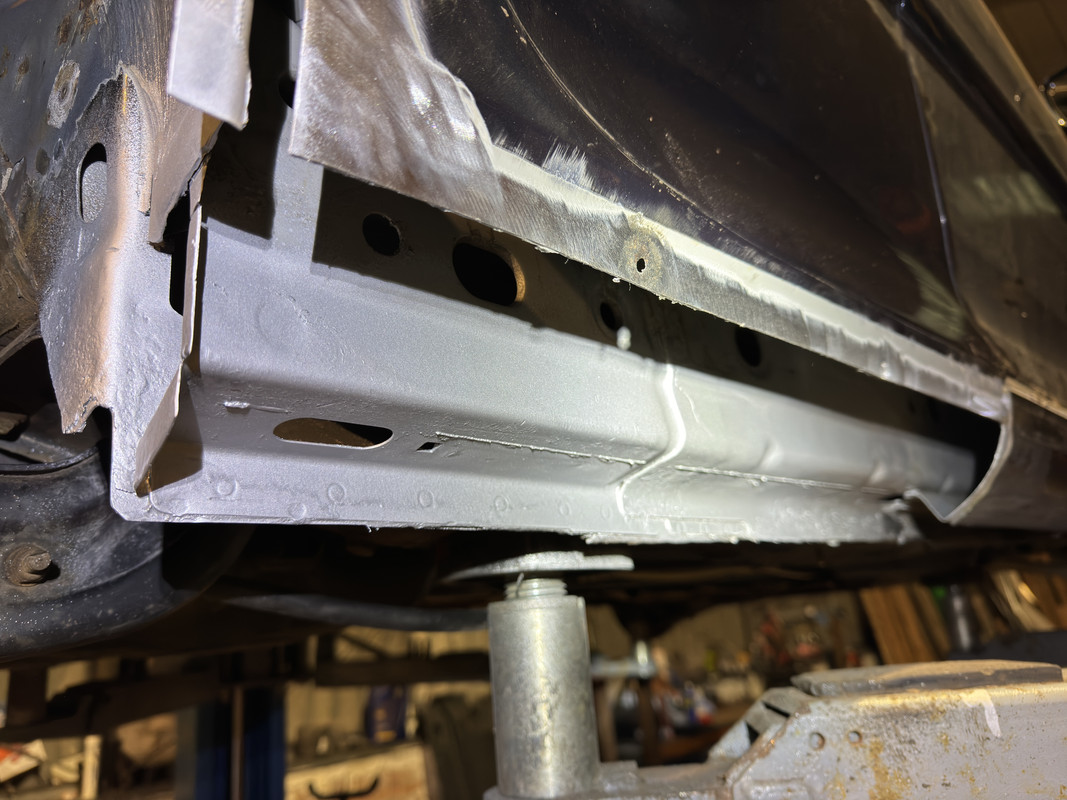
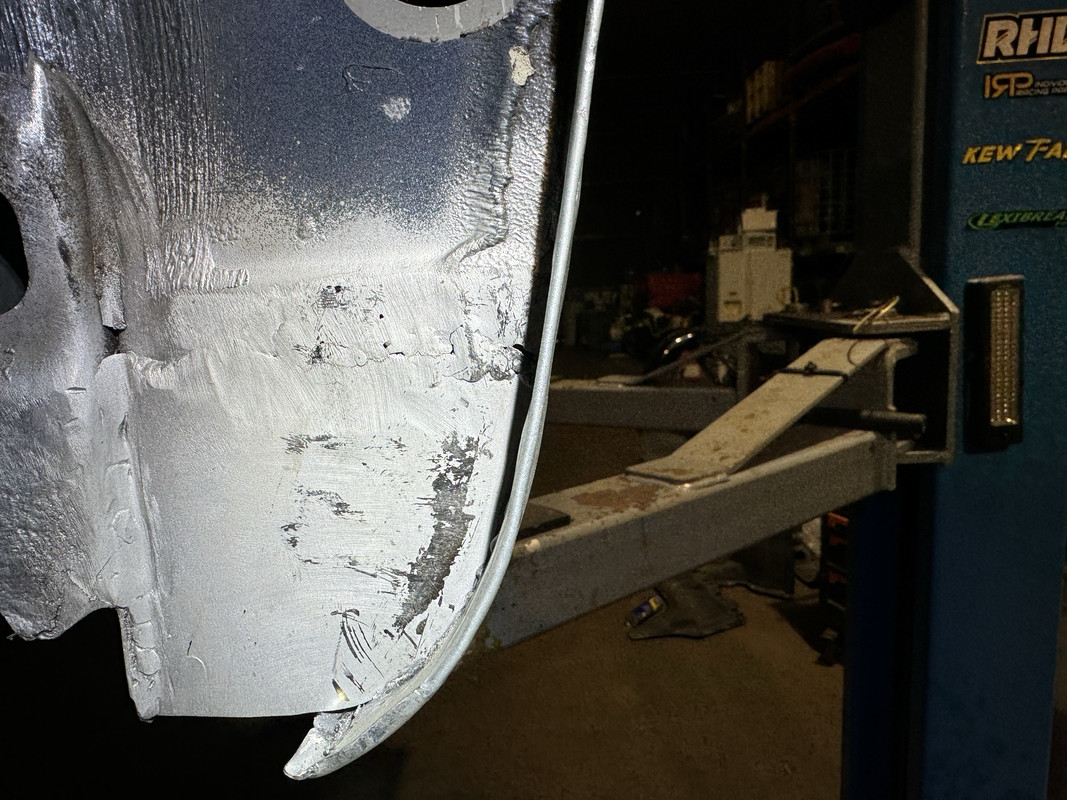
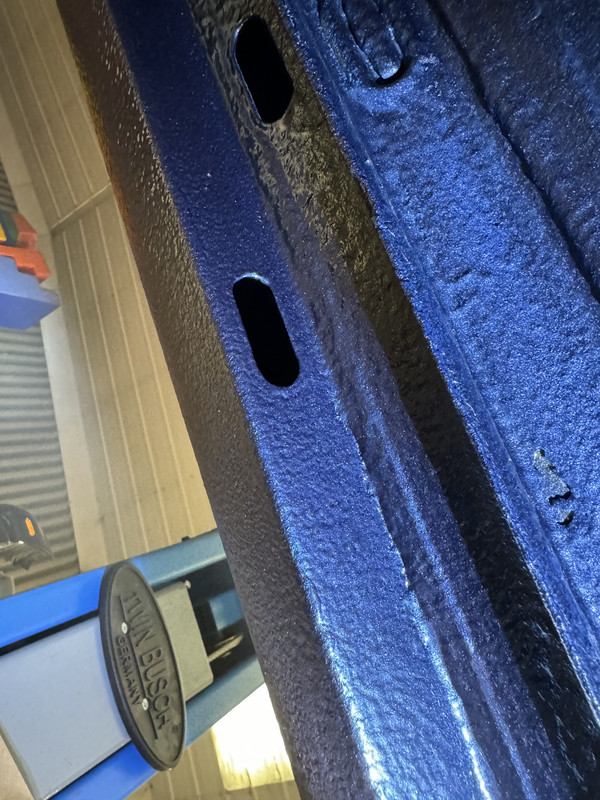
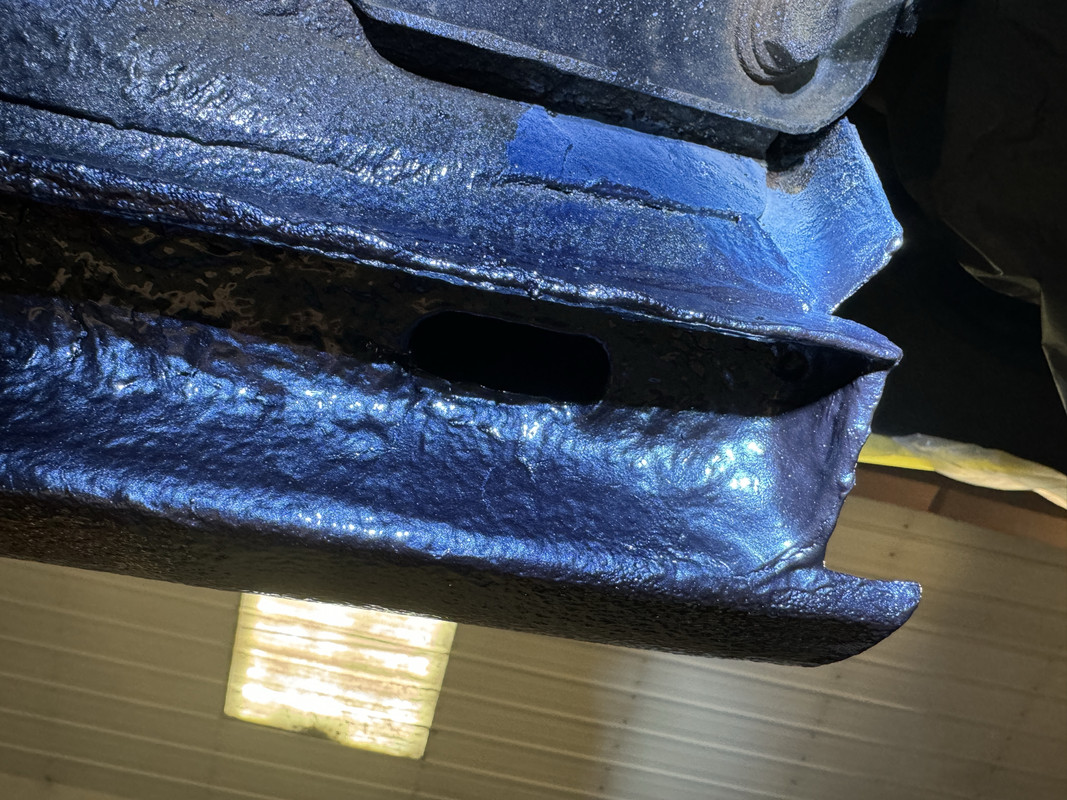
Once all the rust was cut out I was able to get an inspection camera along the full outer side of the sills which let me determine if I was going to have to replace the entire sills (which I have done on another mk5 and wasn't fun). Most of the areas were easy enough to get into and clean the metal inside with sanding discs or a wire wheel. I used zinc weld through primer within the sills to make sure they weren't bare metal that would end up rusting again.

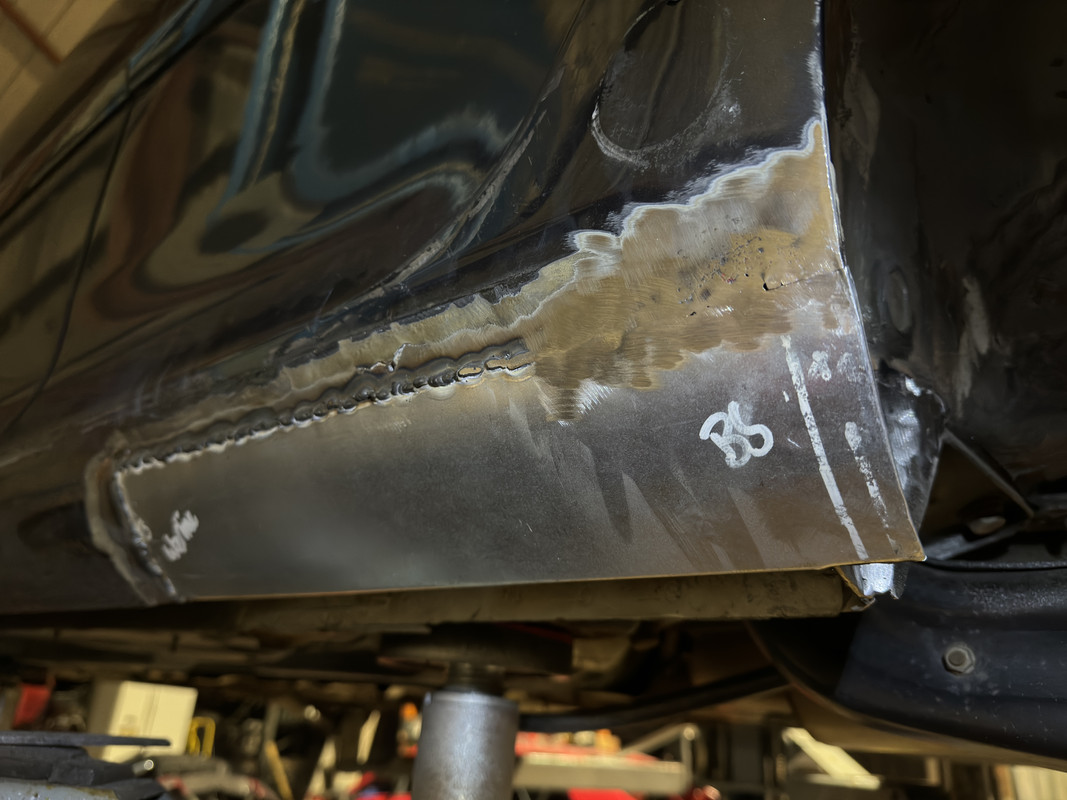
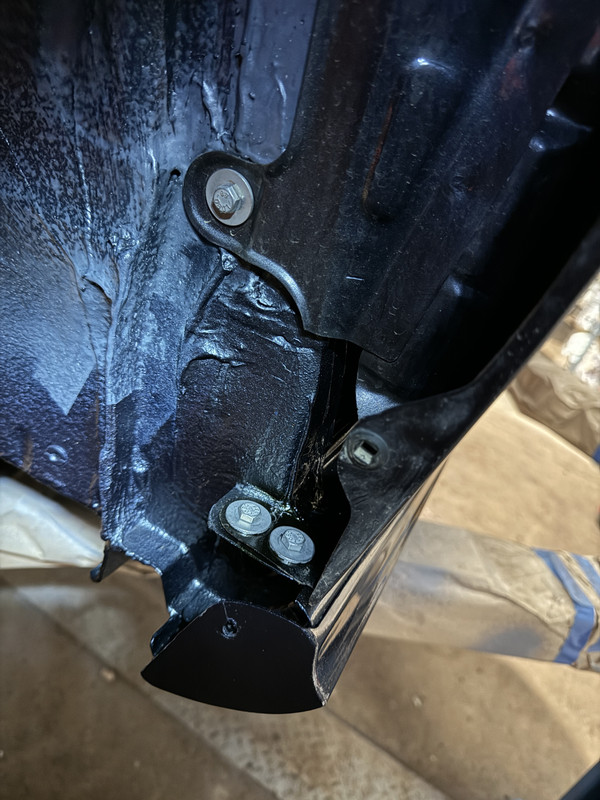
I bought 1 full sill panel from eBay which gave me enough to work with when replacing the 3 parts I cut out. The sill shape on a mk5 is pretty easy to work with and match upto. The repair panels were slightly warped and took some panel beating to make them look like the original shape. The back lower arch areas I used spare metal I had lying around and manipulated it to match the original shape. Once all the welding work was done I had to panel beat the rear arch lip areas as the panel never came pre bent.

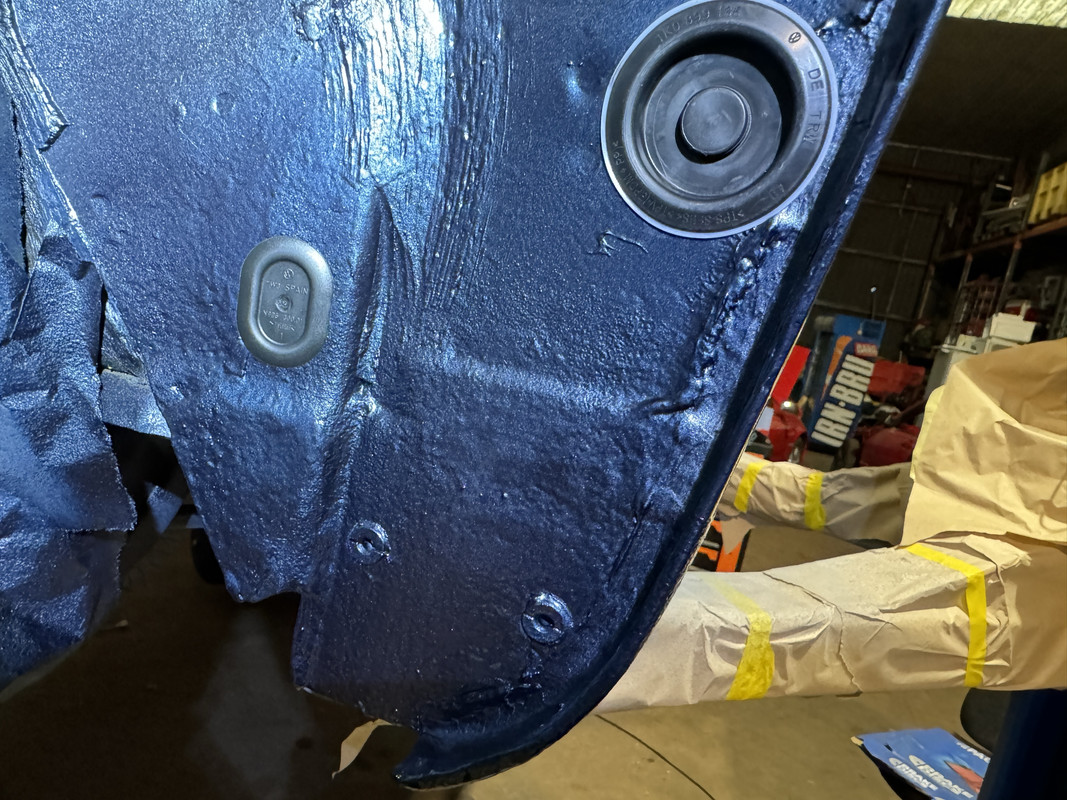
At this point I then got some torx screw plastic inserts from VW so I could refit the lower arch liner rubber splash guards. I ended up chopping these up as the design doesn't allow water or mud to escape and will lead to more build up and eventually rust.

I filled the whole length of the sills, inner arch, jacking points and inspection panel with BiltHamber Dynax S50 cavity wax. Also used some of this to coat the arch lip areas as it dry's like a hard wax and will repel water really well.

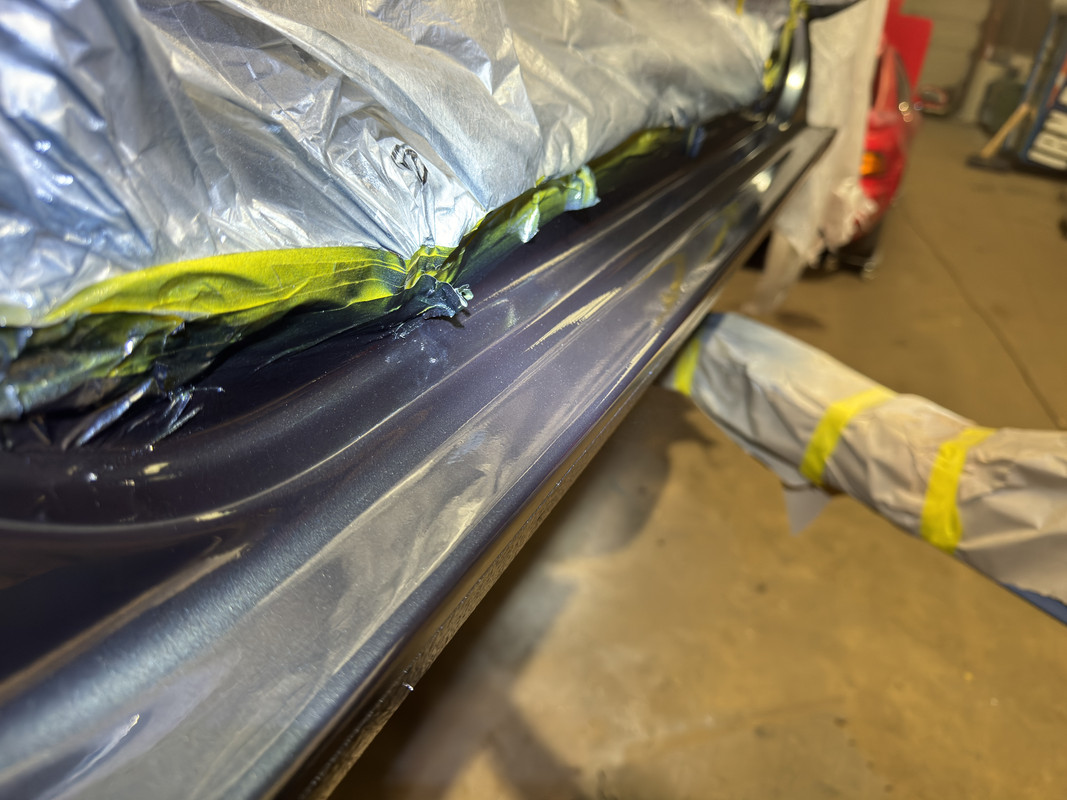
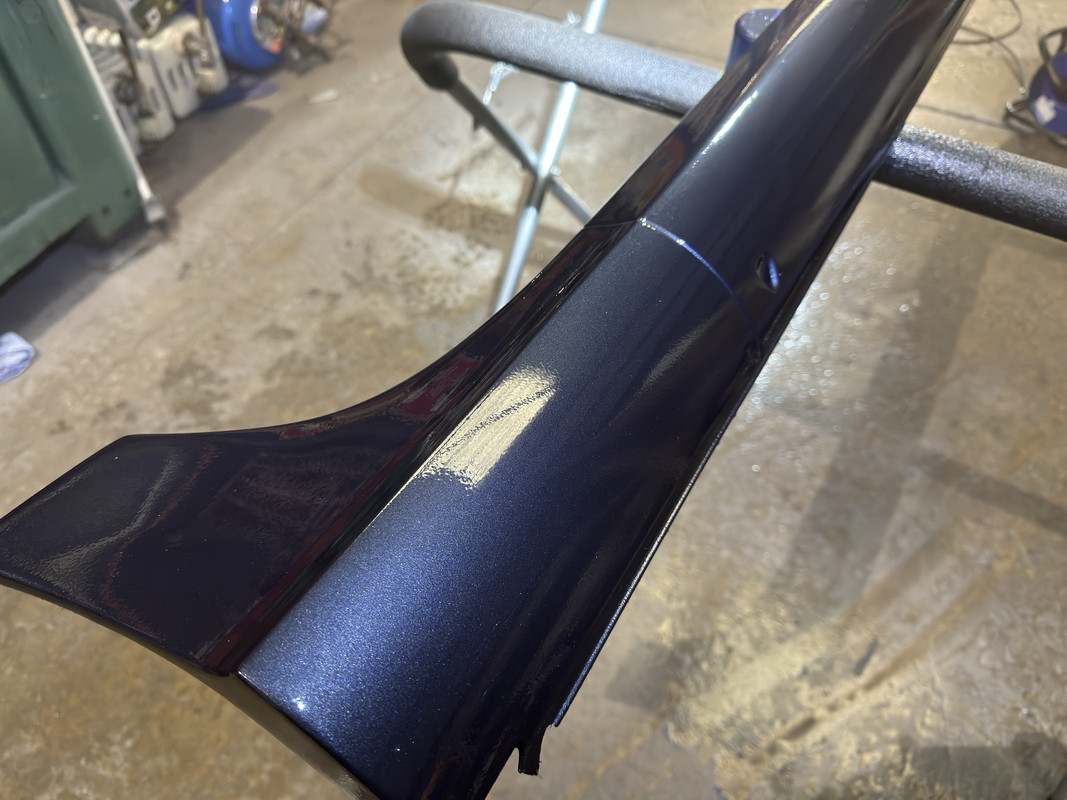
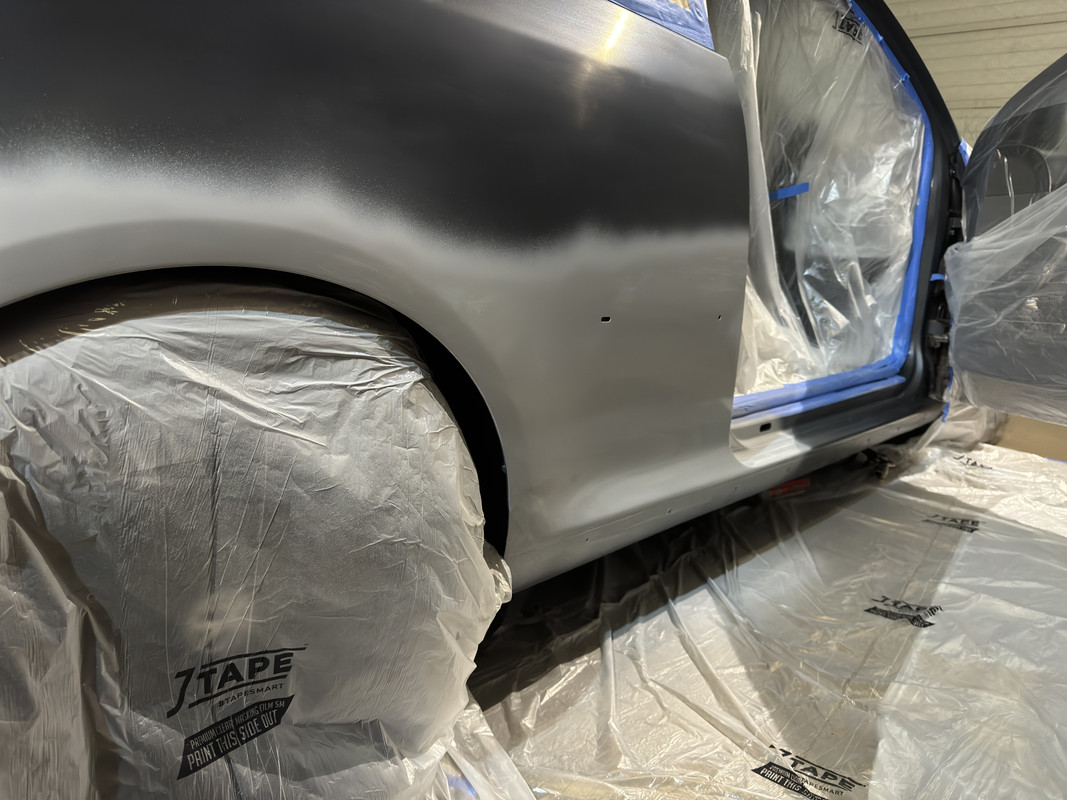
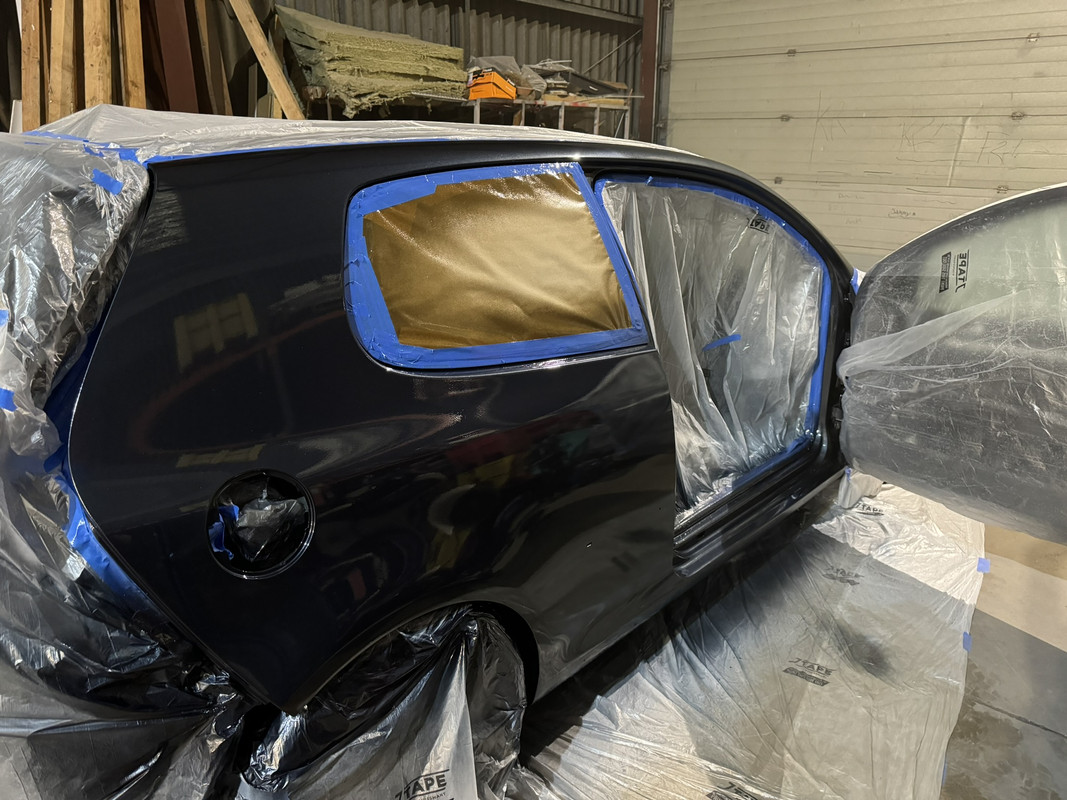
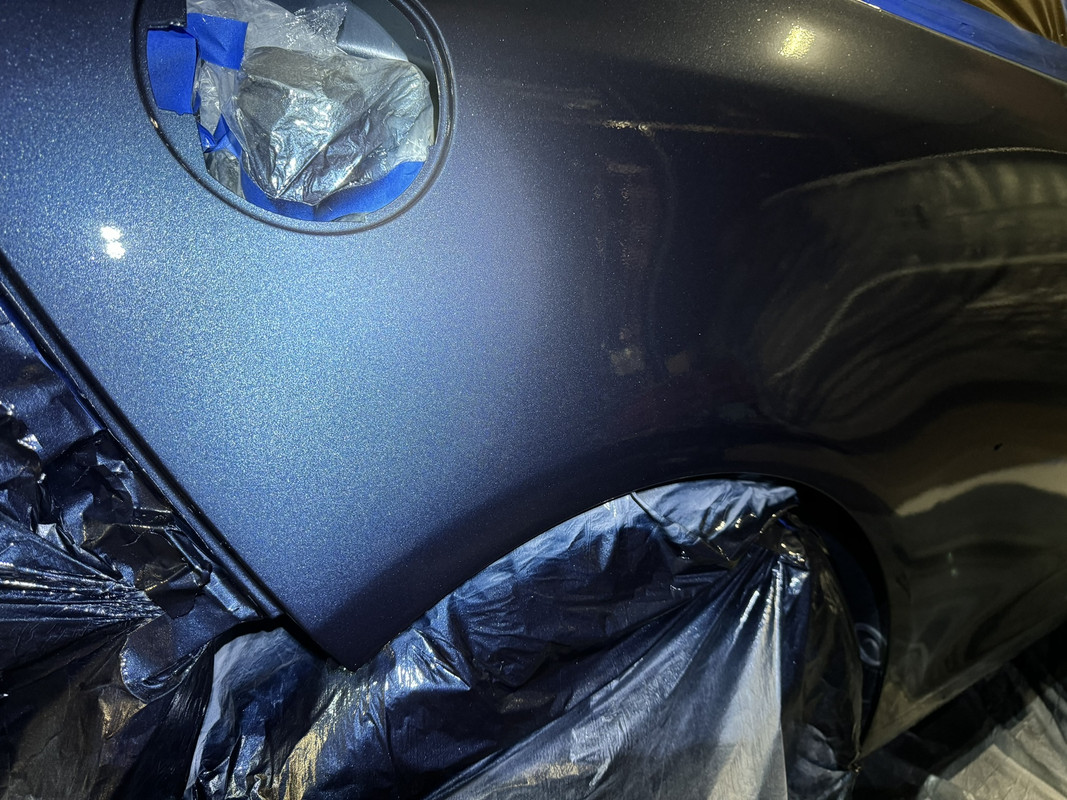
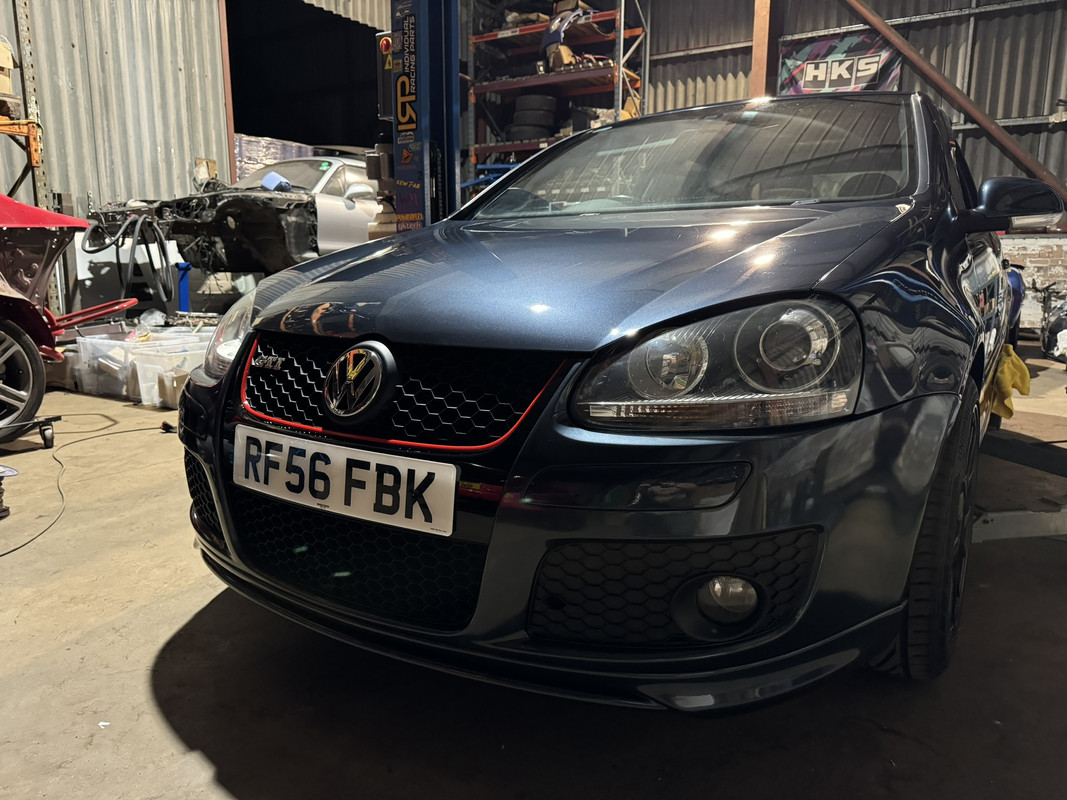
Now to the frustrating part.. I wanted to learn how to paint and have been doing so for the past few months, I thought this would be perfect time to attempt painting/blending. First off I sanded and painted the new bumper I got. Turned out ok but could have been better. Next up was the grill and the Edition 30 lower lip, both of these turned out great. I also wanted to smooth and colour code the side skirts as the front/rear lower bumpers were no longer black textured plastic. After watching many youtube videos I finally committed to painting both rear quarters. At this point I was ******* myself as I was about to take sandpaper to my car and possibly have an epic fail of trying to paint it. The passenger side I managed to sand the lower half of the quarter, door shut and blend the new paint into the original paint. The door shut turned out great but the rear quarter you could see a haze line between the original paint and the new paint. I tried wet sanding again and polishing which did blend the colour to the point it is barely noticeable.

For the drivers side I had to sand upto the plastic bump strip that runs along to meet the door, this made it very difficult to paint and not see a difference in the finish/colour. First attempt was ok but I ended up sanding too much when wet sanding and went through the clear coat. Had to sand the whole area and start again. Second attempt.. I had ran out of paint and ordered a new batch, this one looked very slightly lighter than the paint I was using on the rest of the car. I ended up mixing it with the little amount I had before and started painting again. On the second attempt it turned out even worse because I didn't sand the primer back enough you could tell a height difference between the new paint and the original paint. At this point I was close to giving up as I couldn't achieve the finish/match I was aiming for, so I called around a few places to paint the rear quarter but was being told I would have to wait 6 weeks minimum bearing in mind the car had been off the road for 4 weeks at this point. I then spoke to a few painters for advise on blending and achieving a good finish, they recommended I changed my technique and purchase some good quality paint guns.

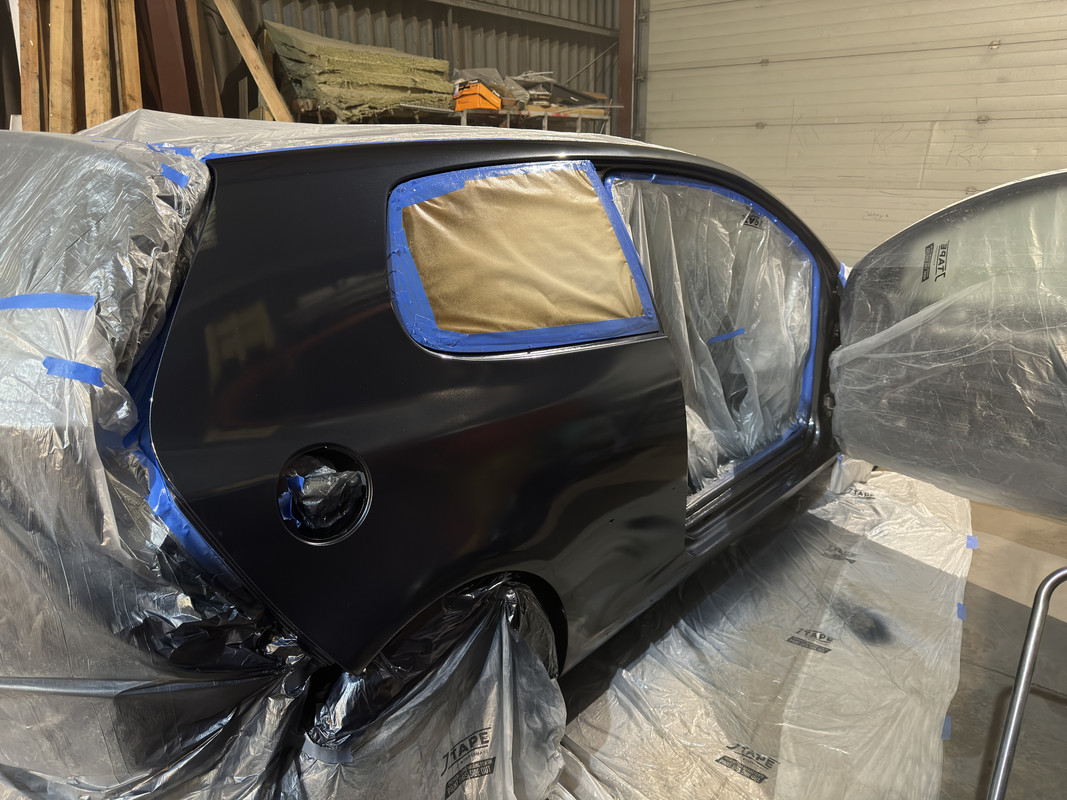
I could either wait and spend the money on getting someone else to do it £600 or buy a good set of guns and try again £400. I had planned on painting another project car I was working on so I decided to end up buying the new guns and getting as much advise as I could. I sanded the lower half back to bare metal and scuffed up the whole quarter, door jam and sill area and attempted it again. This time it turned out great and the new guns made a massive difference. Paint match is really good and the finish is night and day different to the results I was seeing before. I think I spent a good 20+ hours this time masking off the whole area, sanding, wet sanding, painting, polishing etc. Finally achieved the result I wanted and gave me much more confidence in painting other projects in the future.

Some pictures of the before, during and after.